


Google Chrome is one of the most popular browsers, but you may want to uninstall Chrome if it is slowing down your system or switching to another browser. However, removing it is not always as simple as clicking the uninstall button.
Many users encounter issues like "Chrome is still running" errors, failed uninstallation attempts, or leftover files clogging storage. Even after uninstalling, residual data often remains that can interfere with future installations.
If you've tried uninstalling Chrome but keep running into roadblocks, don’t worry. This guide will walk you through step-by-Step 0solutions, from standard removal methods to forced uninstalls, ensuring a clean and complete removal. Let’s get started!
How to Uninstall a Program on Different Devices | A Detailed Guide
How to Uninstall Chrome Via Master Uninstaller
If you want to uninstall Chrome effortlessly, there's no need to manually delete leftover files after removing the app. Master Uninstaller does all the work for you with just one click. It removes Chrome and wipes out residual files automatically, saving you time and effort. Ready to see how it works? Follow these simple steps below.
- First, you need to download the Master Uninstaller on your computer.
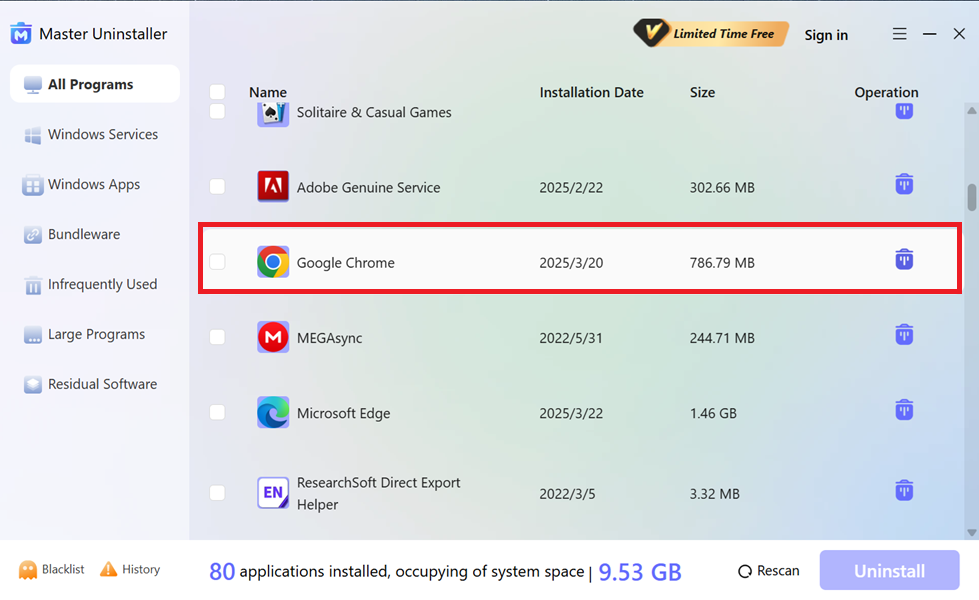
Step 01: Uninstall the App
- Once you are on the dashboard, find the Google Chrome app you want to remove and click the Bin button next to it.
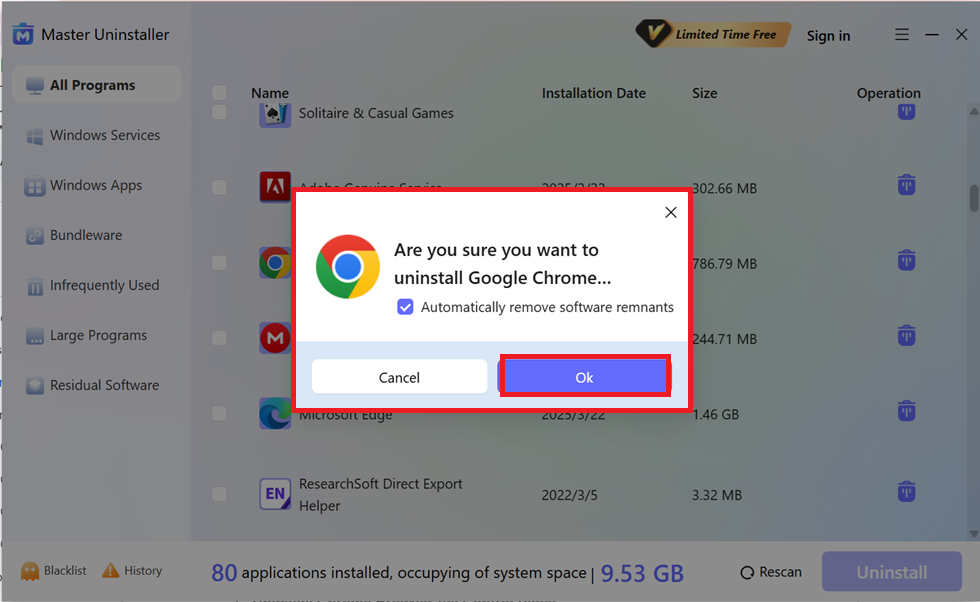
- Select Automatically Remove Software Remnants and click Ok.
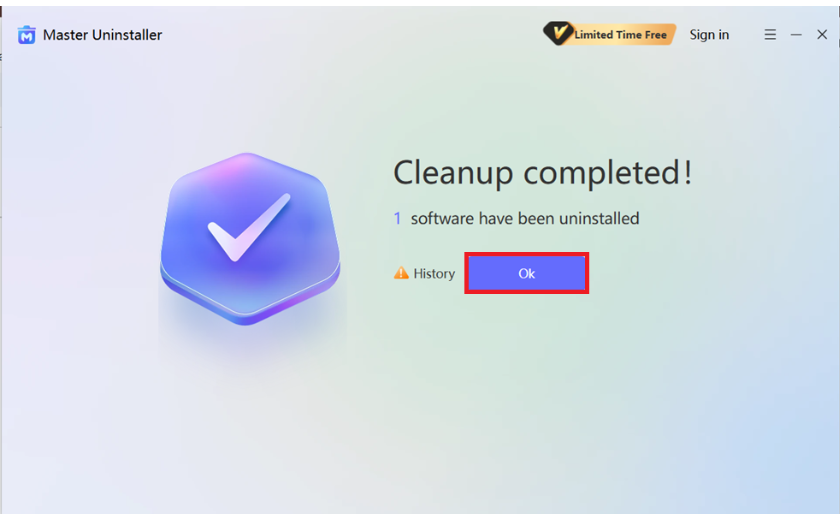
And tada, with just one click, Google Chrome Browser is Uninstalled!
How to Uninstall Chrome on Windows | 3 Methods
Now, if you prefer ritualistic methods of uninstalling Chrome from your Windows PC, you can use Settings, Control Panel, or Command Prompt; though each method works differently. While these options will uninstall the browser, Chrome’s leftover files may still linger, taking up space on your system. Let’s take a look at these three different methods.
Method 01: Uninstall Chrome Browser Via Windows Settings
If you want a simple way to remove Chrome without using external tools, Windows Settings is the best option. Whether clearing space, troubleshooting issues, or switching browsers, this method lets you uninstall Chrome in just a few steps. Keeping in mind, it won’t automatically delete residual files, so some extra cleanup may be required.
Step 01: Open Windows Settings
- Press Win + I to open the Settings menu, then navigate to Apps in the left panel.
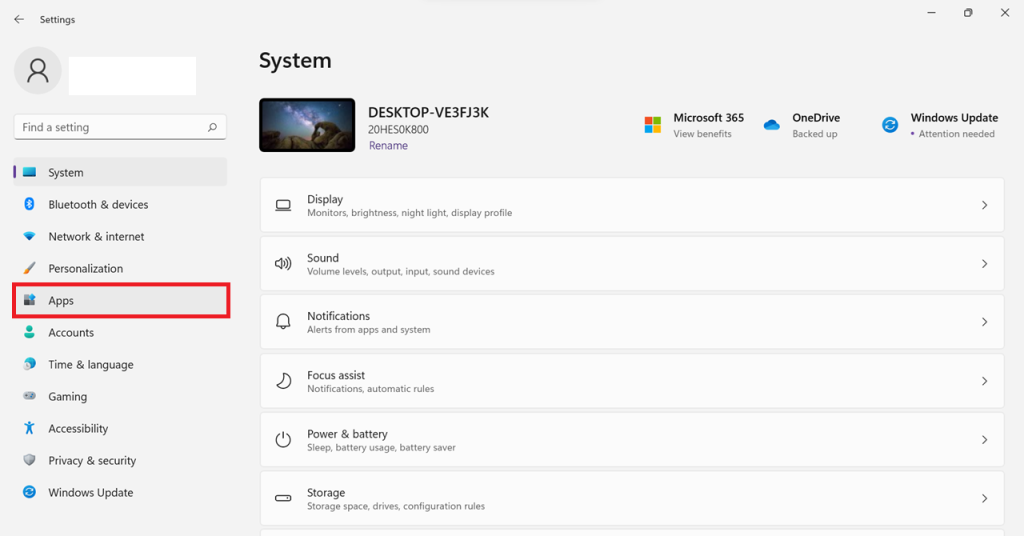
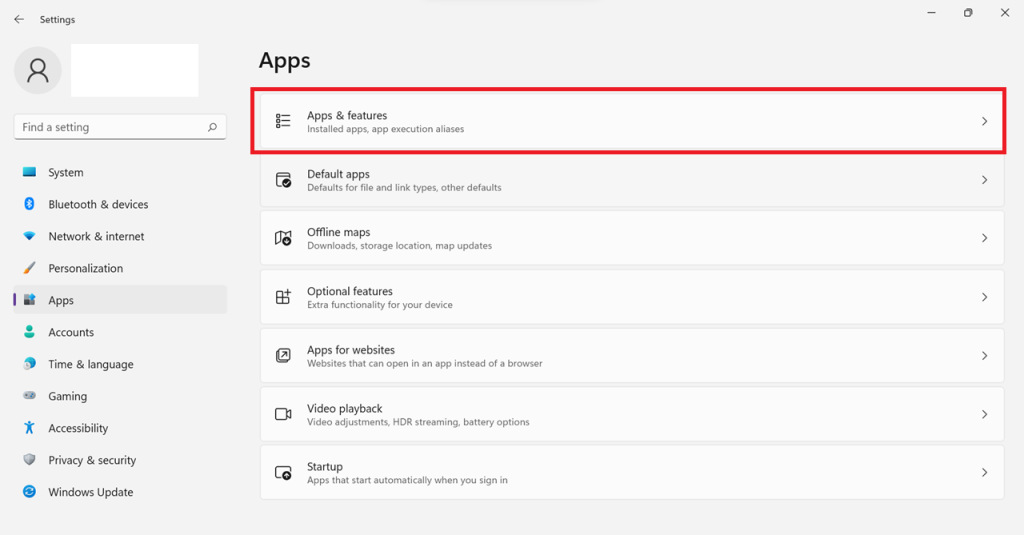
Step 02: Access Installed Apps
- Click on Apps & Features to view all programs installed on your system.
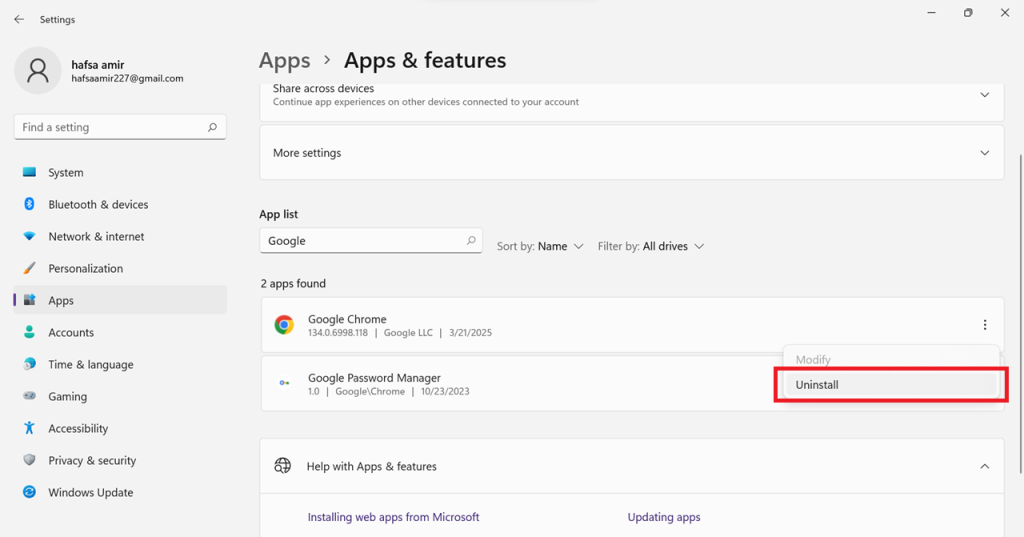
Step 03: Locate Google Chrome
- Scroll through the list or use the search bar to find Google Chrome. Click the three-dot menu next to it.

Step 04: Uninstall Chrome
- Click Uninstall, then confirm when prompted. Follow any additional on-screen instructions to complete the process.
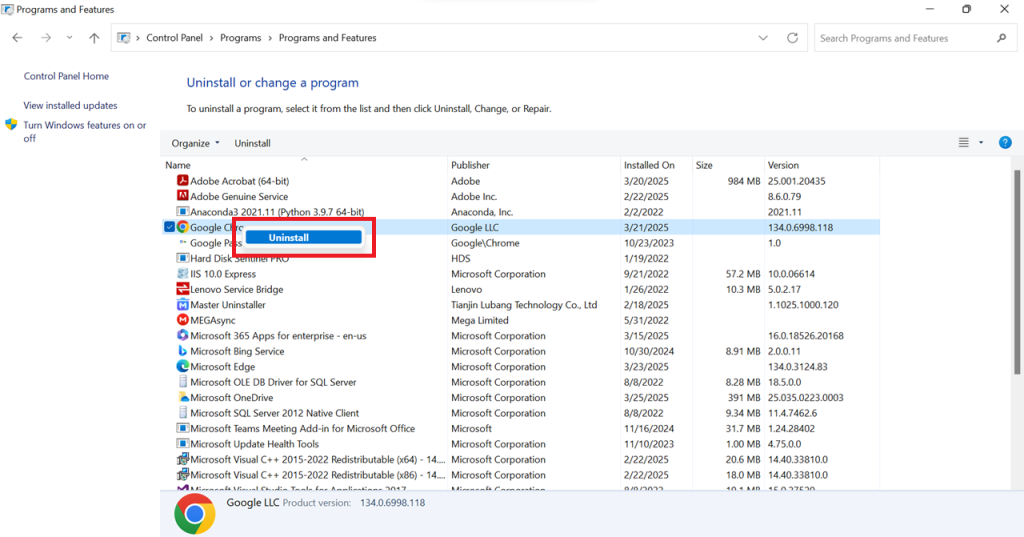
Method 02: Uninstall Chrome Browser Via Control Panel
Using the Control Panel is a reliable option if you’re looking for a more detailed removal process. This method is particularly effective for EXE or MSI-based installations, ensuring Chrome is removed like any other desktop program. However, it won’t delete leftover files, so a manual cleanup may still be required.
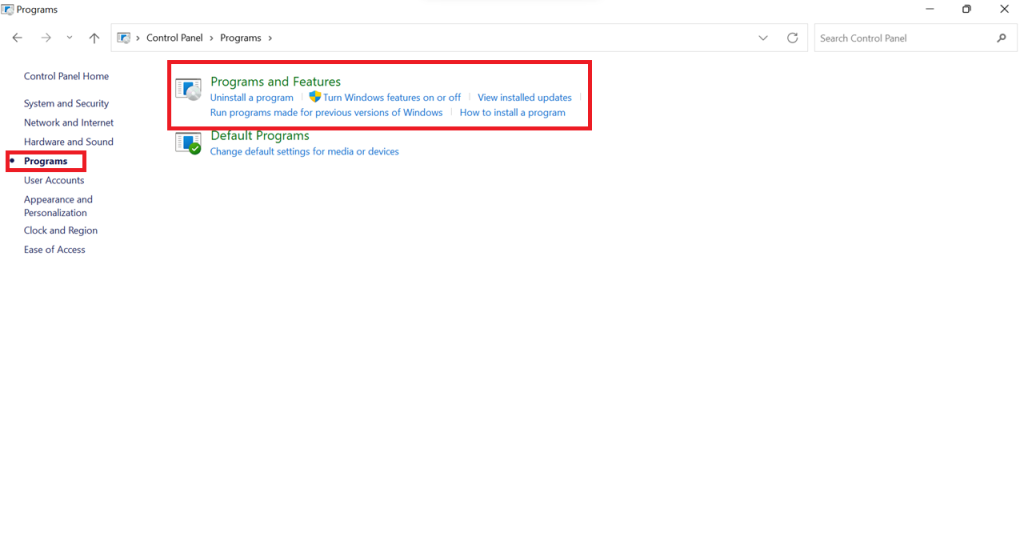
Step 01: Open Control Panel
- Press Win + R, type Control, and hit Enter to launch the Control Panel.

Step 02: Access Programs & Features
- Click on Programs, then select Programs and Features to view the list of installed applications.
Step 03: Uninstall Chrome
- Now, scroll through the list or use the search bar to find Google Chrome. Right-click on Google Chrome and select Uninstall. Follow the on-screen instructions to complete the removal.
Method 03: Uninstall Chrome Browser Via PowerShell & Registry Editor
If Chrome is pre-installed or cannot be removed typically, you can manually delete it using PowerShell and Registry Editor. This method ensures complete removal, including leftover files.
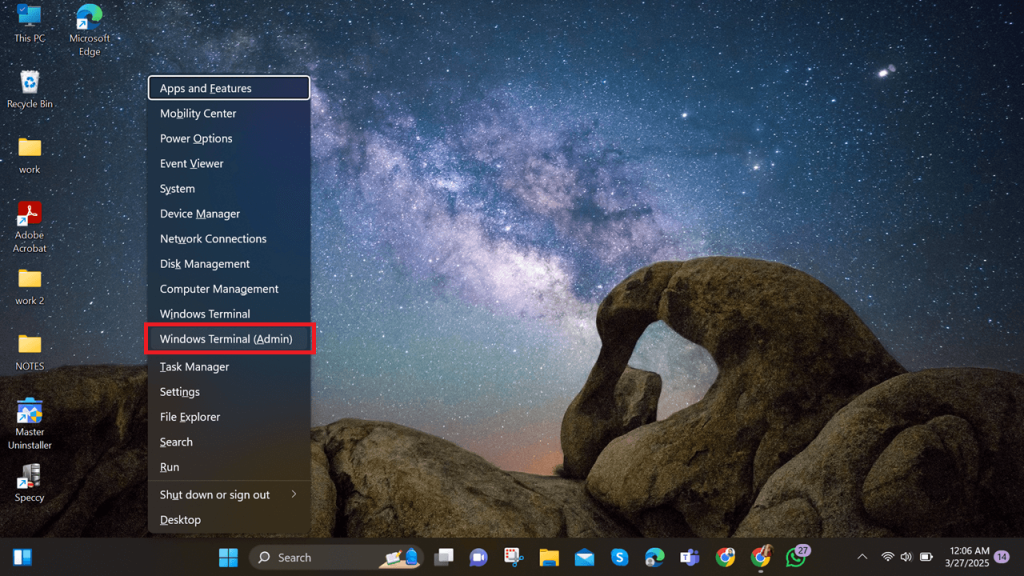
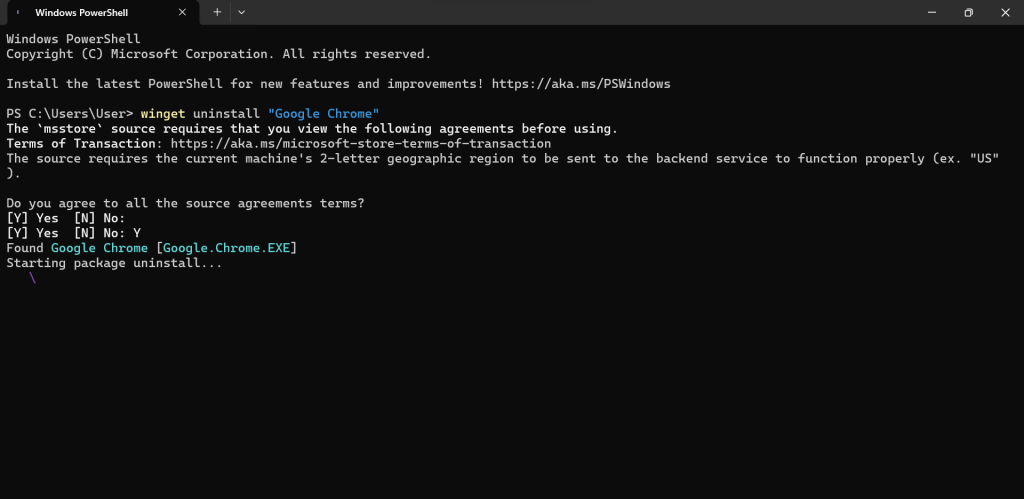
Step 01: Open PowerShell as Administrator
- Press Windows + X and select Terminal (Admin) or Windows PowerShell (Admin).
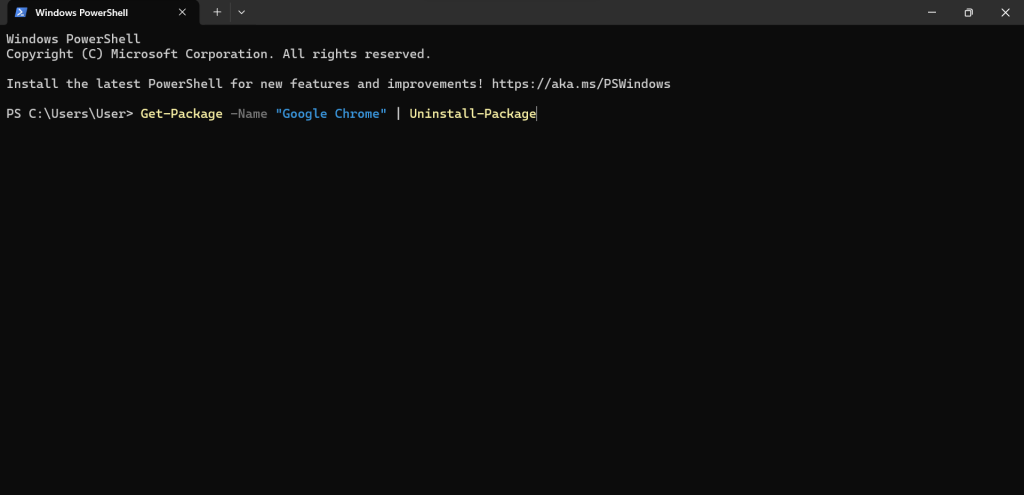
Step 02: Uninstall Chrome Using PowerShell
- Run the following command to remove Chrome:
Get-Package -Name "Google Chrome" | Uninstall-Package
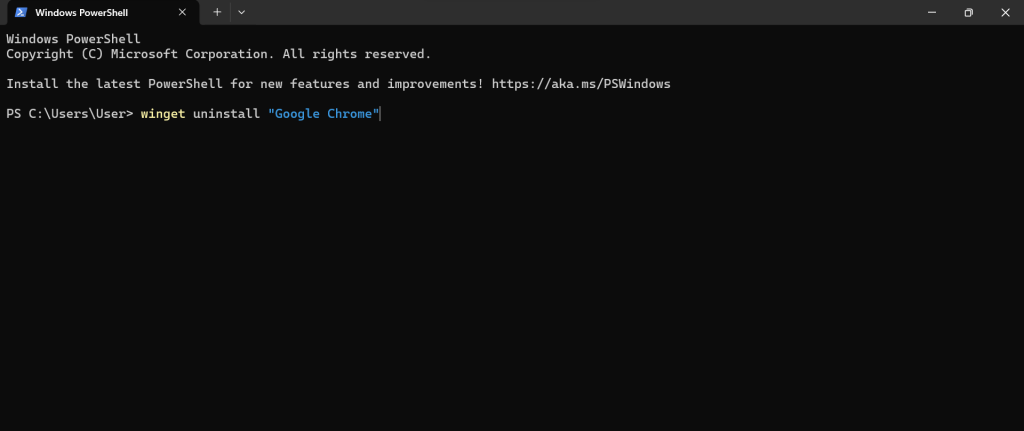
- If this does not work, try using winget:
winget uninstall "Google Chrome"
Follow the on-screen instructions to confirm the uninstallation by pressing Y.
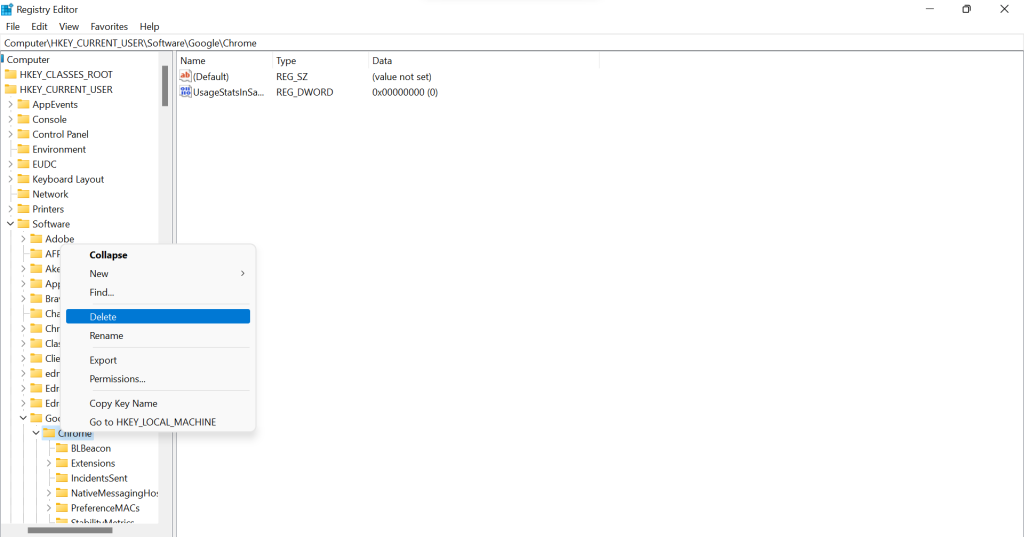
Step 03: Remove Chrome from the Windows Registry (Optional)
To remove Chrome’s registry entries:
- Press Windows + R, type regedit, and press Enter and navigate to:
HKEY_CURRENT_USER\Software\Google\Chrome
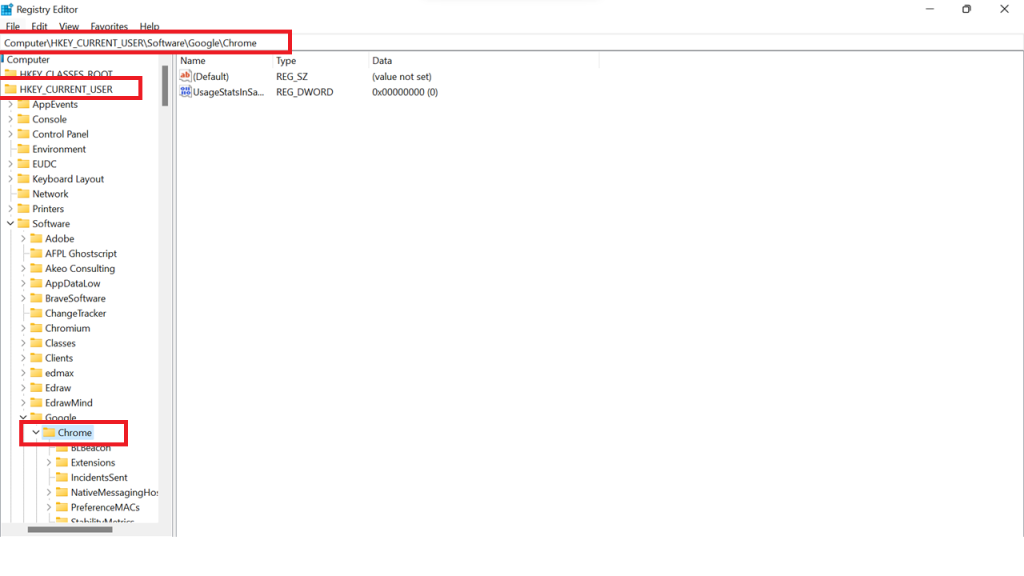
HKEY_LOCAL_MACHINE\SOFTWARE\Google\Chrome
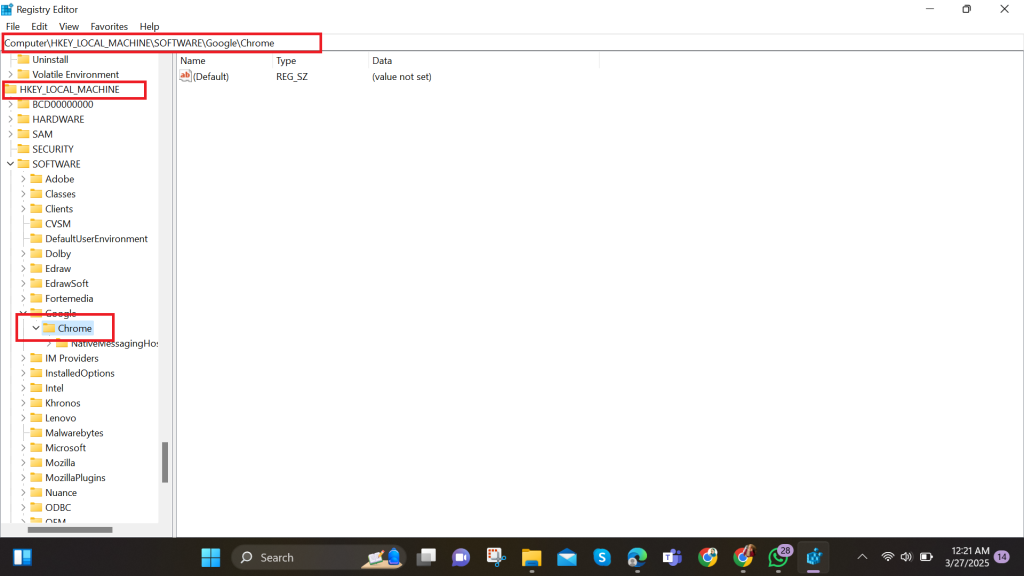
- Right-click on the Chrome folder and select Delete.
Step 04: Restart Your PC
Once deleted, restart your computer to finalise the removal.
How to Uninstall Chrome on macOS | 2 Methods
Method 1: Uninstall Chrome via Finder
Another way to uninstall a program on your Mac is to send it to the Trash. However, like the launch pad, this method does not remove the program’s associated files from the system; you must delete them manually. Follow these simple steps to use the Mac’s trash function.
Step 01: Quit Google Chrome
- Make sure Chrome is not running. Click Chrome > Quit Google Chrome or press Cmd + Q.
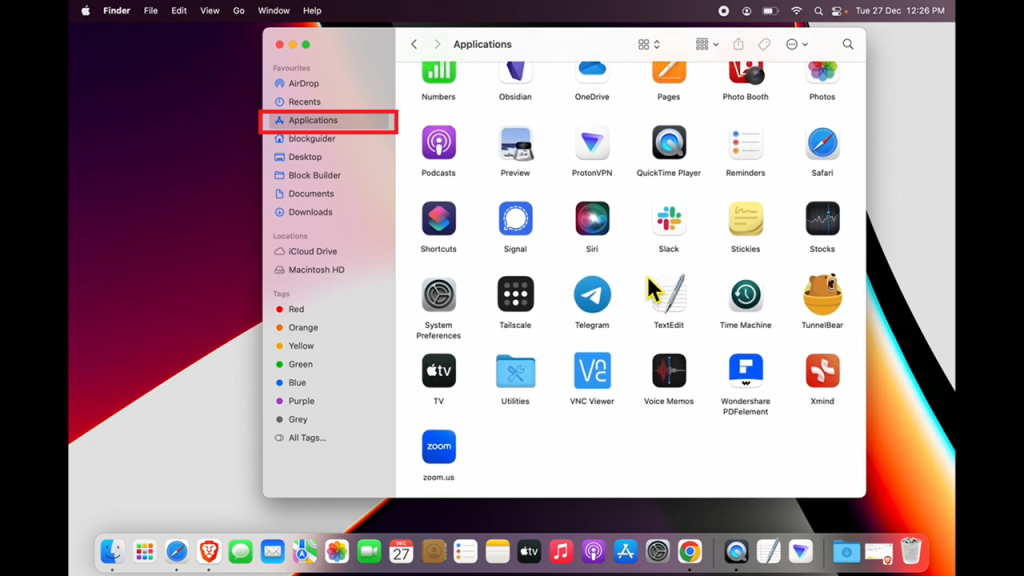
Step 02: Open Finder and Go to Applications
- Click the Finder icon in the Dock, then select Applications from the left sidebar.
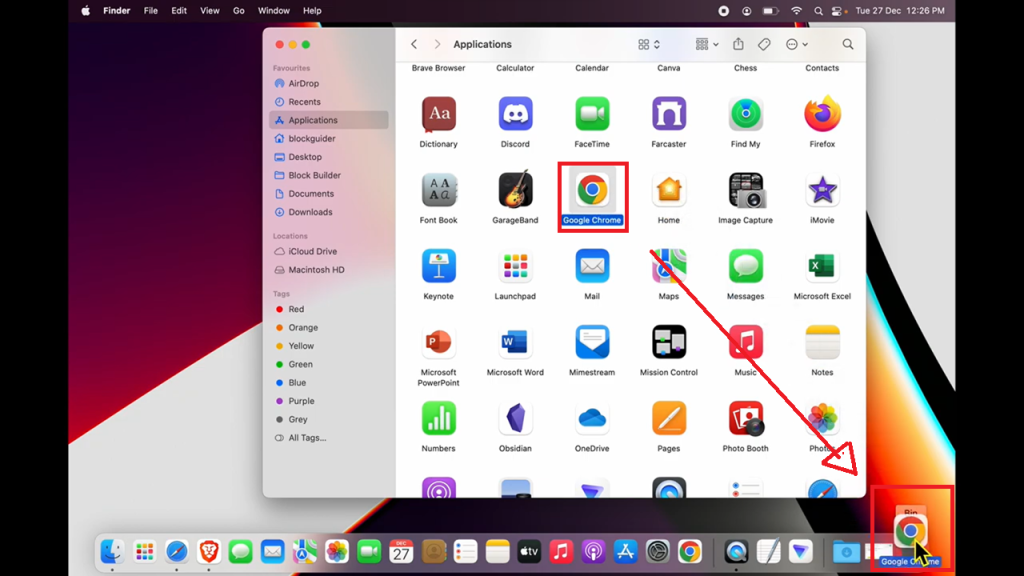
Step 03: Move Chrome to Trash
- Find Google Chrome, drag it to the Trash bin, right-click, and select Move to Trash.
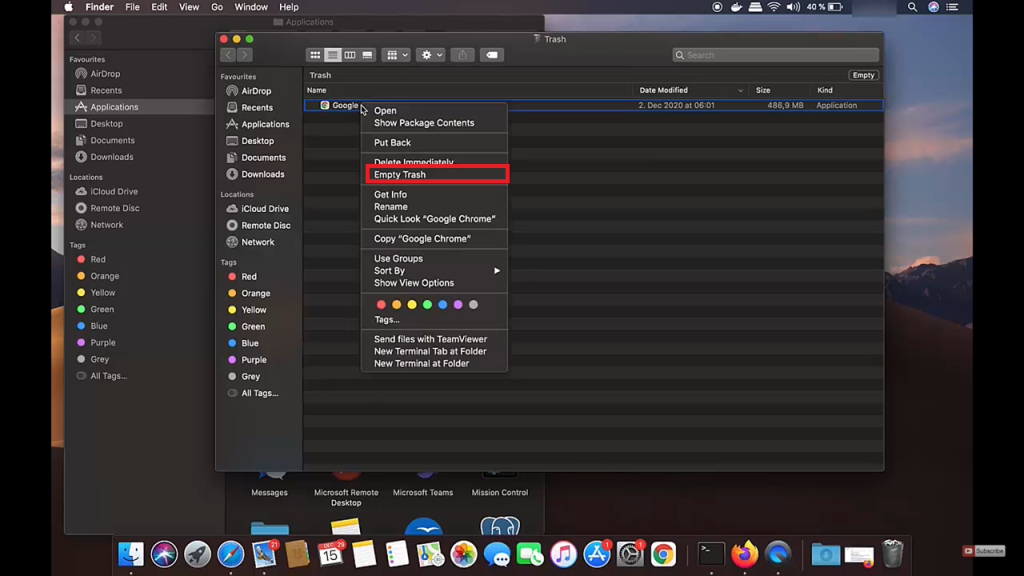
Step 04: Empty the Trash
- Right-click the Trash bin in the Dock and select Empty Trash to remove Chrome from your system.
Method 2: Uninstall Chrome Completely via Terminal
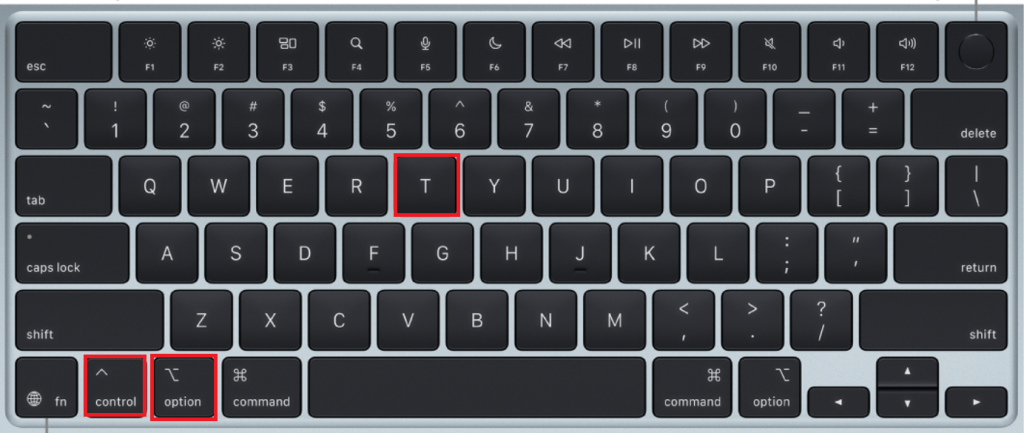
Step 01: Open Terminal
- Press Cmd + Space, type Terminal, and hit Enter. Alternatively, you can use the shortcut key of Control + Option + T to open the terminal.
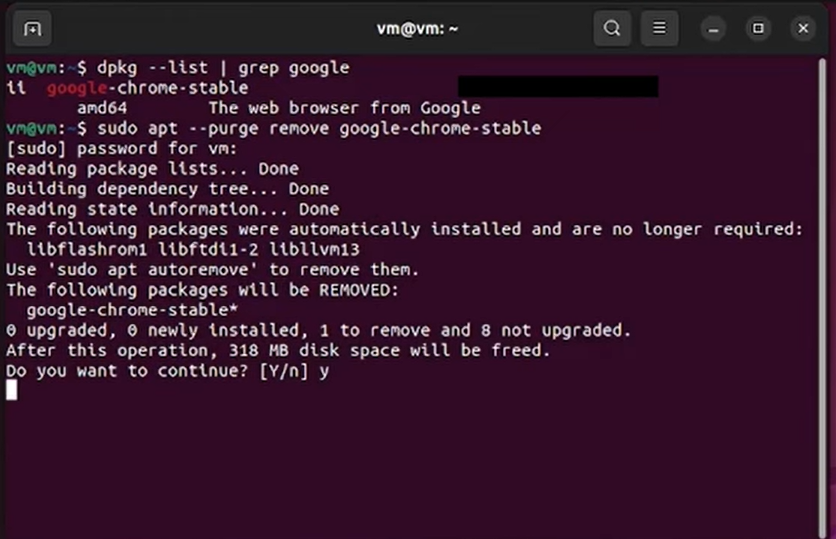
Step 02: Check the Installed Chrome Package
- Once in the Terminal and run the following command to check if Chrome is installed:
dpkg --list | grep google
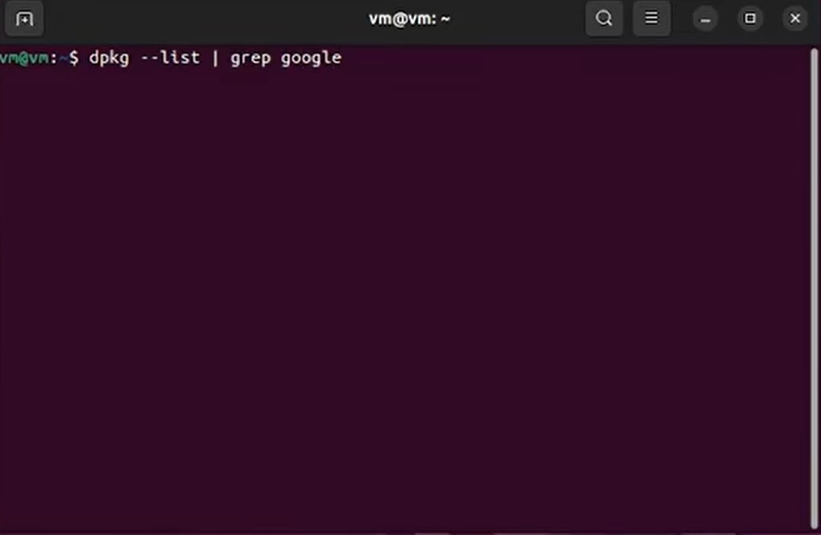
This will list all installed Google Chrome packages on your system.
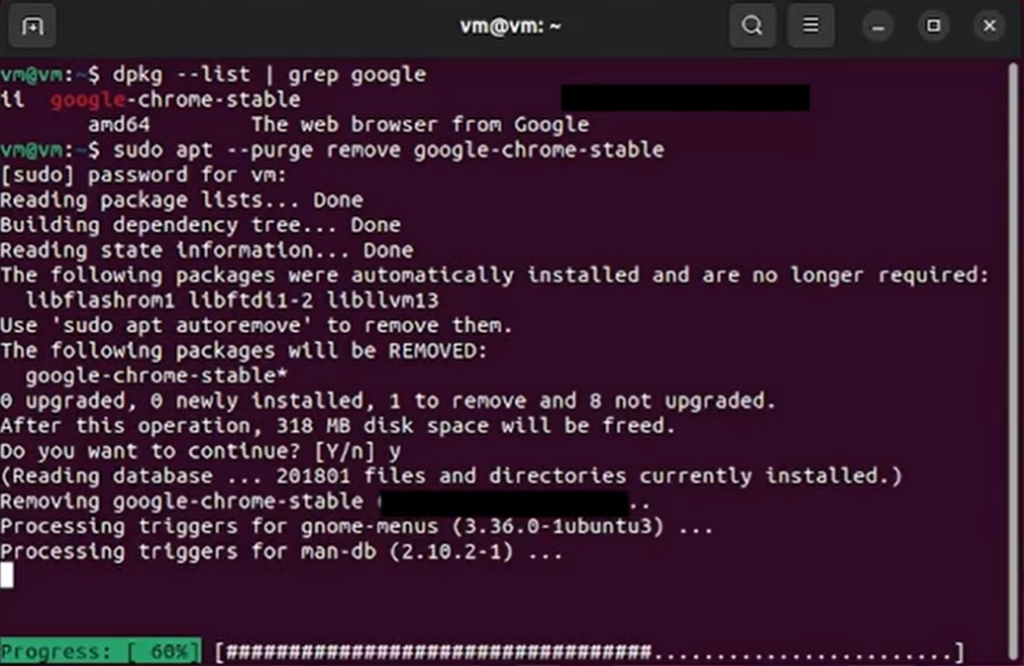
Step 03: Remove Google Chrome
- To uninstall Chrome completely, use the following command:
sudo apt --purge remove google-chrome-stable
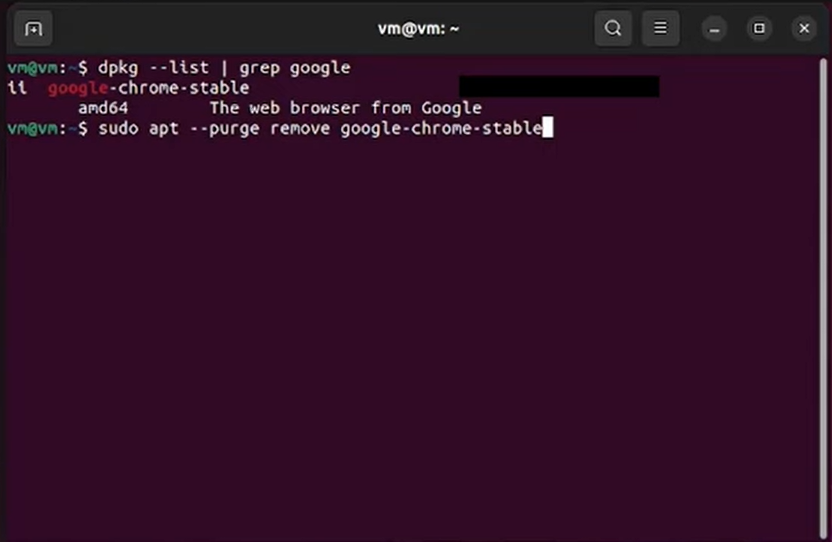
This command will remove Chrome along with all its associated configuration files.
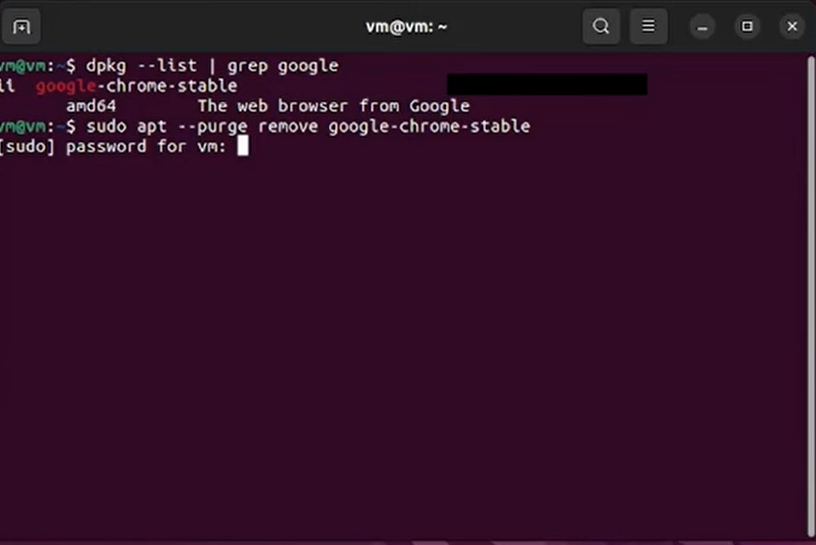
Step 04: Enter Your Password
- When prompted, enter your sudo password and press Enter to continue.
Step 05: Confirm Uninstallation
- The terminal will display a message asking if you want to proceed. Type Y and hit Enter to confirm.
This will clean up any leftover files that were automatically installed with Chrome.
And just like that, Chrome will be removed from your PC. If you want to verify its complete uninstallation, execute this program:
dpkg --list | grep google
If no output appears, Chrome has been successfully removed.
How to Uninstall Chrome on an Android Phone | 2 Methods
Method 1: Disable Chrome (For Pre-Installed Versions)
If Chrome came pre-installed on your Android device, you won’t be able to uninstall it completely. However, disabling it will remove it from your app drawer and stop it from running in the background.
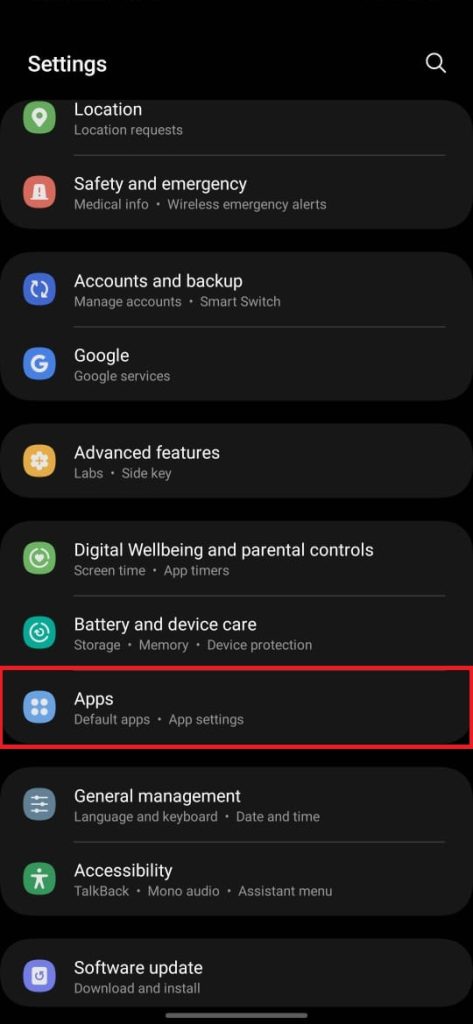
Step 01: Navigate to the Apps Folder
- Unlock your phone, go to Settings, and tap on Apps or Apps & notifications.
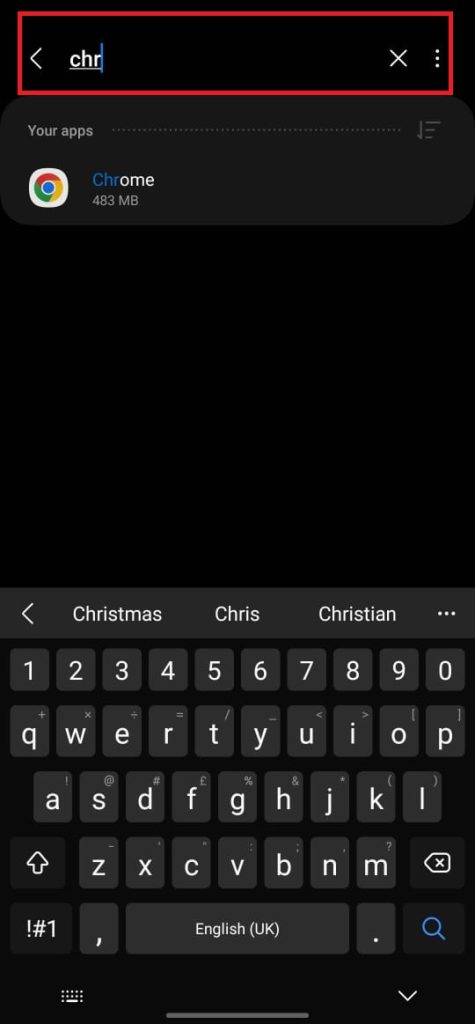
Step 02: Find Google Chrome
- Once inside, scroll down or use the search bar to find Chrome.
Step 03: Disable Chrome
- Tap on Google Chrome → Tap Disable → Confirm by tapping Disable app.
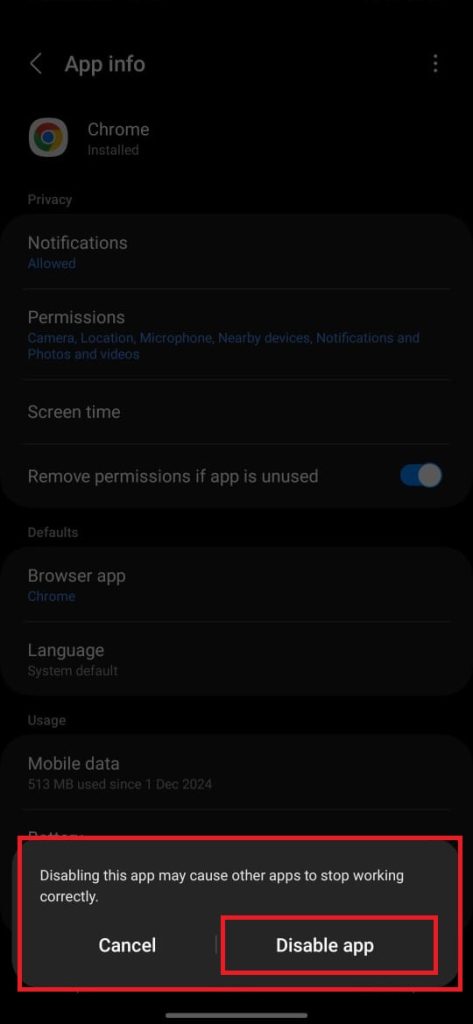
This will stop Chrome from running and remove it from your home screen.
Method 2: Uninstall Chrome (For Downloaded Versions)
If you installed Chrome from the Play Store, you can easily remove it like any other app. This will free up storage space and prevent it from using system resources.
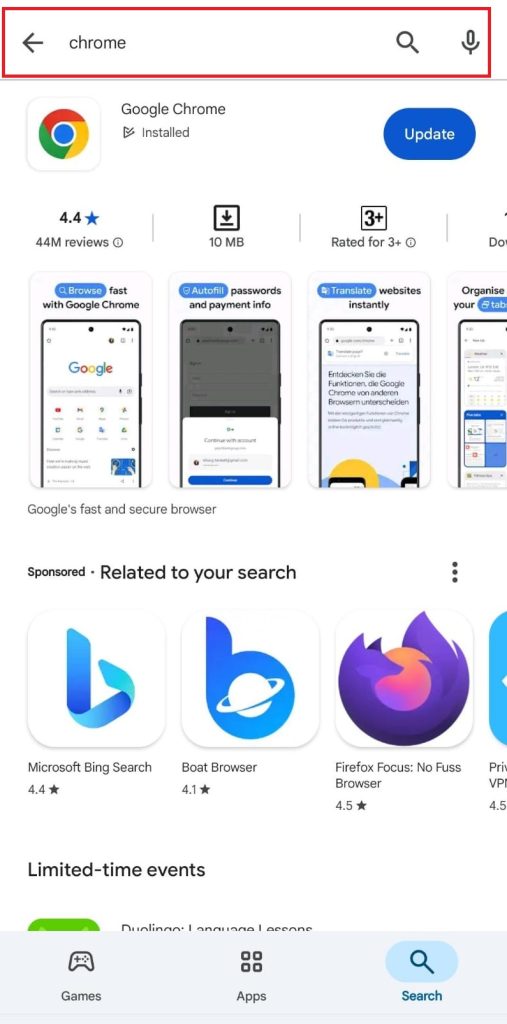
Step 01: Search for Google Chrome on the Play Store
- Launch the Google Play Store app. In the search bar, type Google Chrome and select it from the results.
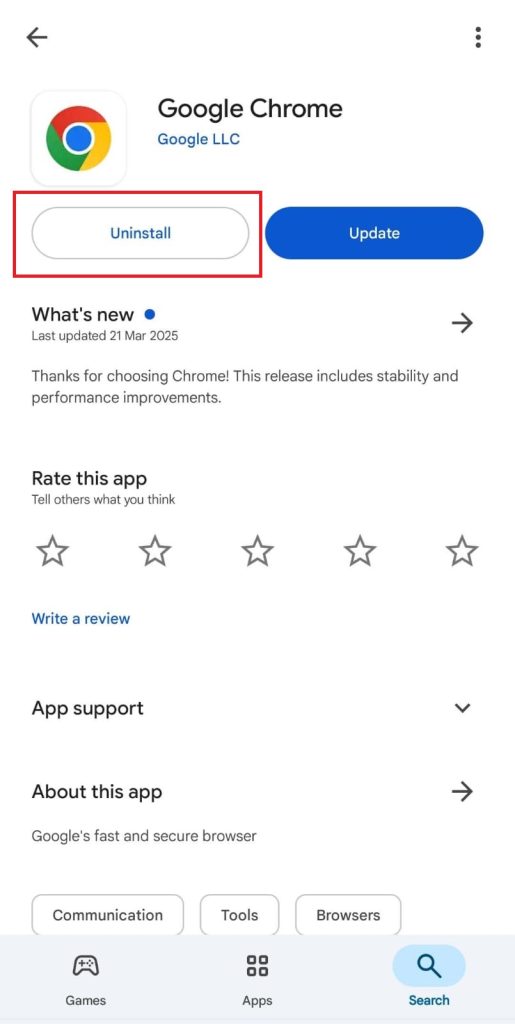
Step 02: Uninstall Chrome
- Tap the Uninstall button and confirm your action.
Common Issues & Troubleshooting While Uninstalling Chrome
Uninstalling Chrome should be simple, but sometimes errors or restrictions prevent complete removal. Below are the most common issues users face and step-by-Step 0solutions.
1. Chrome Still Running at Background
When trying to uninstall Chrome, you might get an error message saying it’s still open. This happens because some Chrome processes run in the background even when the browser is closed.
Here’s the Solution:
- Press Ctrl + Shift + Esc to open Task Manager.
- Under the Processes tab, look for Google Chrome.
- Right-click on each Chrome-related process and select End Task.
- Now, try uninstalling Chrome again.
2. Grey Uninstall Button
Some users find that the Uninstall option in Settings > Apps is disabled, especially if Chrome was pre-installed.
Try using PowerShell to force uninstall:
- Press Windows + X and select Terminal (Admin) or Windows PowerShell (Admin).
Run this command:
Get-AppxPackage *GoogleChrome* | Remove-AppxPackage
- Restart your PC and check if Chrome is gone.
3. Chrome Keeps Reinstalling
If Chrome keeps returning after you uninstall it, leftover files and settings might be causing automatic reinstallation.
This is what you need to do:
- Delete Chrome’s remaining files manually:
- Press Windows + R, type %localappdata%, and hit Enter.
- Navigate to Google\Chrome\ and delete the folder.
- Go to C:\Program Files\Google\Chrome\ and delete that folder as well.
2. Open Registry Editor (Windows + R, type regedit, hit Enter), and delete:
- HKEY_CURRENT_USER\Software\Google\Chrome
- HKEY_LOCAL_MACHINE\SOFTWARE\Google\Chrome
3. Restart your PC.
4. Chrome Keeps Running
Even if Chrome seems closed, background tasks or extensions might keep it running, preventing uninstallation.
Try this process of uninstalling the Chrome browser from your PC:
- Restart your PC and try uninstalling again.
- If the error persists, use Safe Mode:
- Press Windows + R, type msconfig, and hit Enter.
- Under the Boot tab, check Safe Boot and click OK.
- Restart your PC, uninstall Chrome, then disable Safe Mode.
FAQs
Final Words
By now, you’ve explored multiple ways to uninstall Chrome, whether through Windows Settings, Control Panel, PowerShell, or Command Prompt. While these methods get the job done, they often leave behind residual files and registry entries, which can interfere with future installations or take up unnecessary space.
For a hassle-free and complete uninstallation, consider using Master Uninstaller. It removes Chrome in a single click and cleans up leftover files, browser cache, and registry clutter, ensuring no traces remain. If you want a seamless experience, try it today and enjoy a wholly optimized system.

-

Simple and Practical: Easily uninstall unwanted software.
-
Thorough Cleanup: Completely remove residual files.
-
Blacklist Protection: Identify and block malware and adware.