


Many of us have deleted programs and apps to keep our computers running quicker and with fewer problems. Freeing up disk space helps improve system speed, and the Windows built-in standard uninstall tools work seamlessly for this. However, the problem comes with stubborn programs that spread their residue files throughout the system. This is when some of us question how to delete programs on Windows 10 that won’t uninstall otherwise.
But no worries. Here are 12 proven methods to remove a program on Windows 10, depending on the underlying issue. So, dive right in.
3 Quick Methods on How to Delete a Program on Windows 10
Windows 10 has a few built-in options to delete unwanted programs on Windows 10. Let’s discuss them in detail.
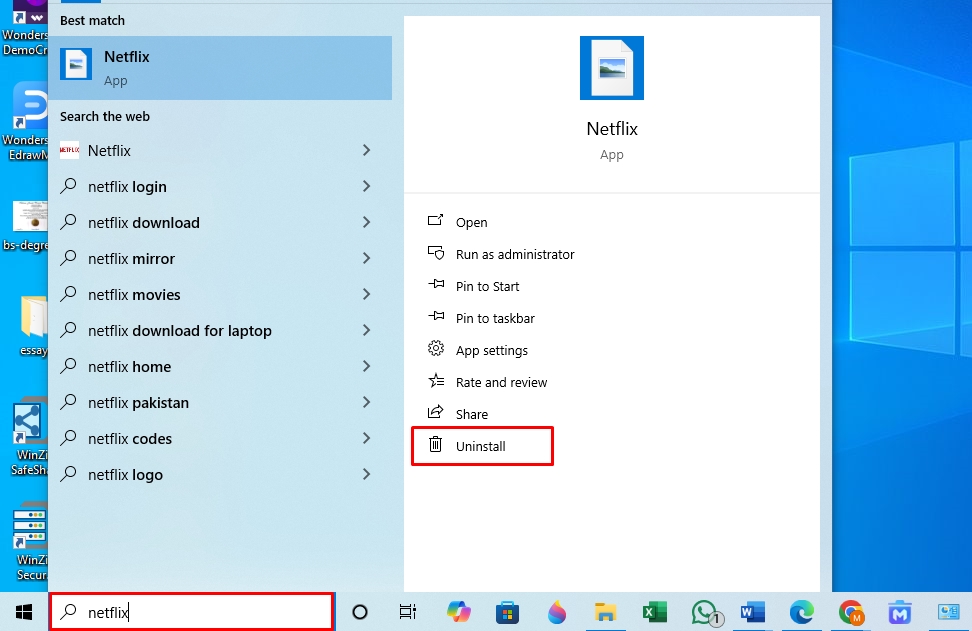
Method 1: Uninstall Apps Using the Start Menu
Deleting programs from the Start menu is the easiest method for Windows 10, as you do not have to open any additional windows. However, doing so will not remove all associated files from the registry. Here is how it goes.
Step 1: Locate the Program
- Open the Start menu, type the Program you wish to remove in the search box, and select Uninstall from the right-side menu.
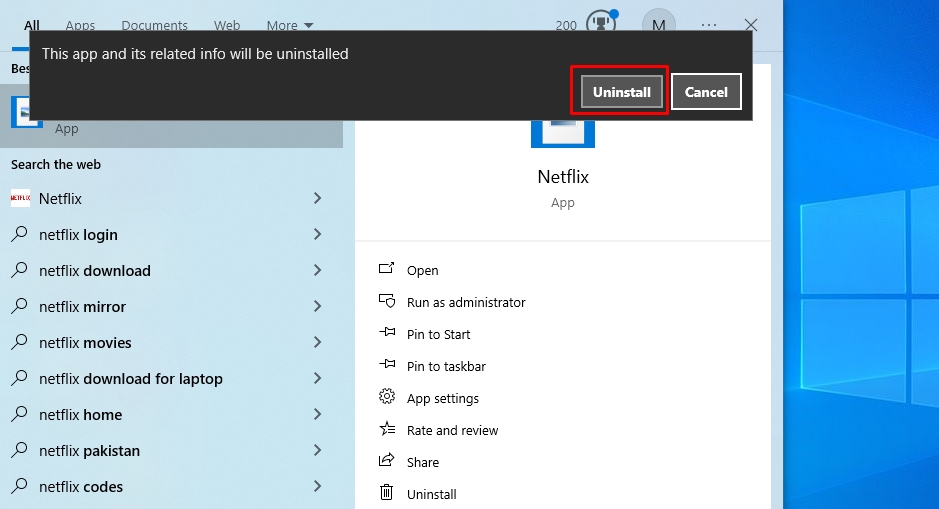
Step 2: Uninstall the Program from the Start Menu
- Again, click Uninstall from the pop-up menu to confirm deletion.
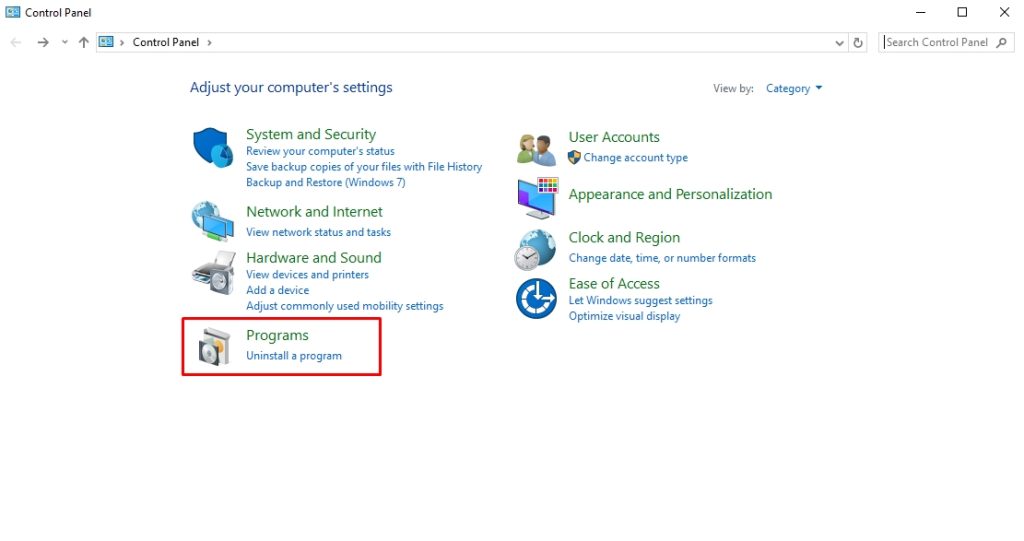
Method 2: Delete Programs Using Control Panel
Using the control panel is yet another straightforward method to delete programs on Windows 10. However, it does not show Windows universal apps and leaves traces in the system. Follow these simple steps to use this system utility and delete installed programs on Windows 10.
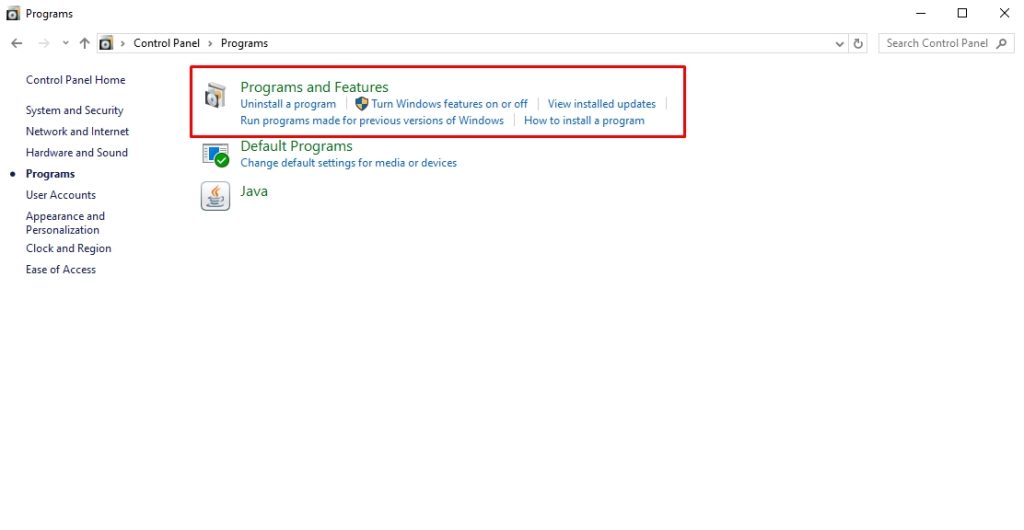
Step 1: Access the Control Panel
- Visit the Start menu to open the Control Panel and select the Programs tab.
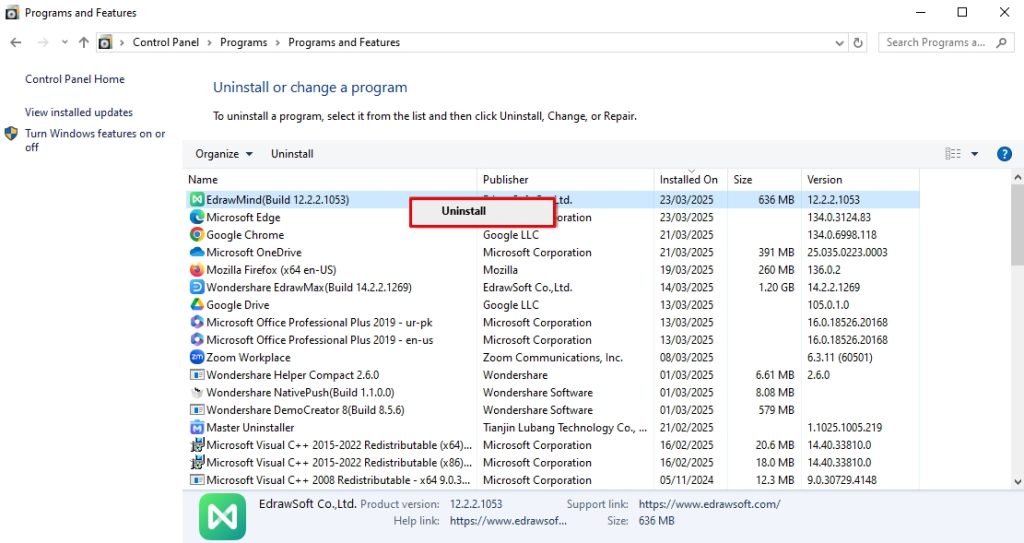
Step 2: Uninstall Programs from the Control Panel
- From here, click Programs and Features > Uninstall Programs.
- Right-click the program you want to delete and click Uninstall. Click OK from the pop-up menu to confirm; it should be deleted now.
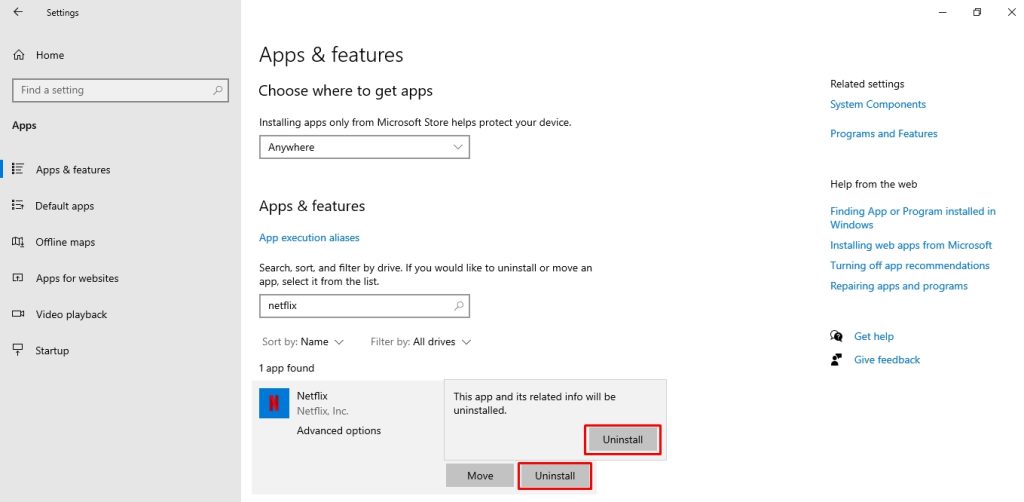
Method 3: Uninstall Programs Using Windows Settings
Windows Settings offers an organized space for users to view all installed apps. So, you can easily remove apps that weren’t present in the control panel. However, though better than the previous two methods, it also leaves residue in the computer and does not completely delete a program from Windows.
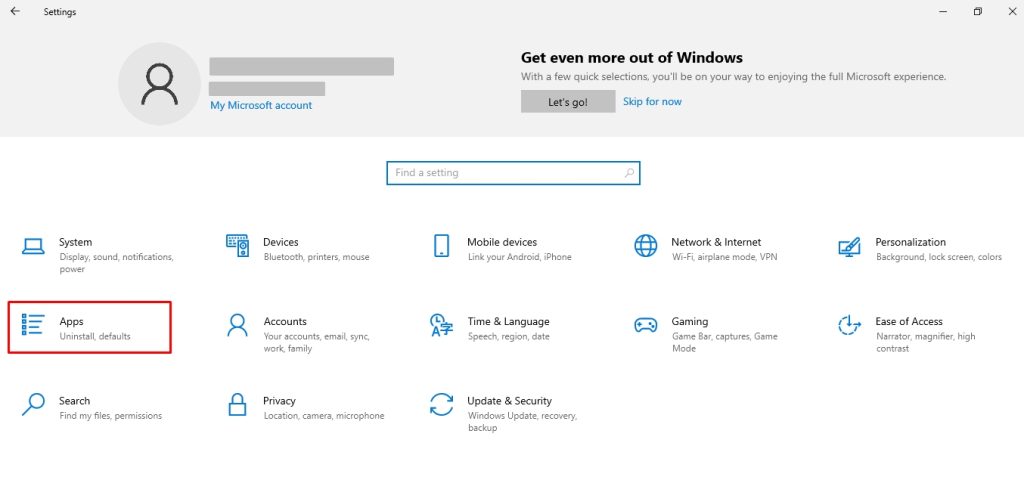
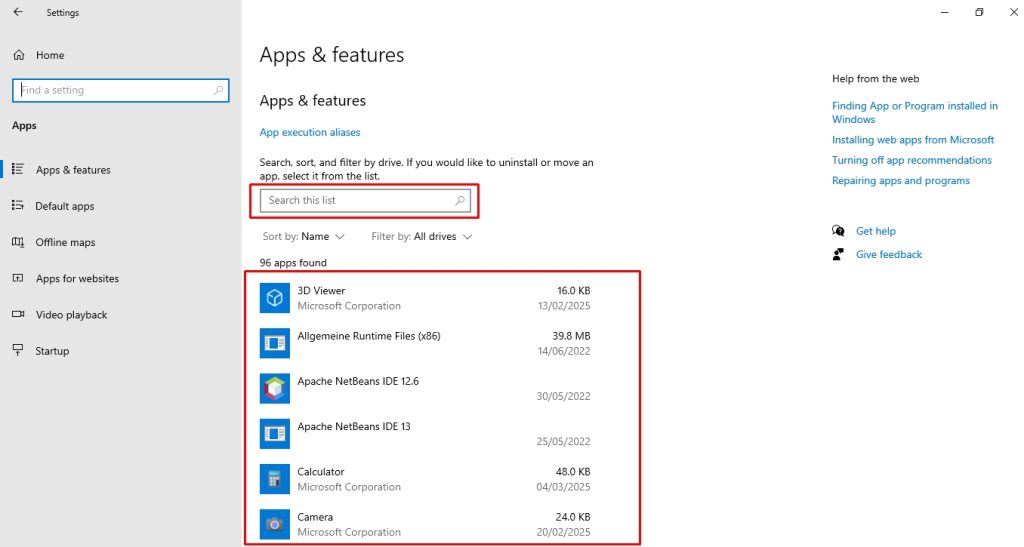
Step 1: Locate Apps from Windows Settings
- Press Windows + I to open Windows Settings and visit the Apps tab.
- Locate the program to be deleted under the Apps and Features tab, or use the search box to find it from the list.
Step 2: Uninstall Apps from Windows Settings
- Finally, click Uninstall > Uninstall, and you have successfully removed it from the PC.
How to Remove a Program from Windows 10 That Won’t Uninstall: 9 Tried-and-Tested Methods
When you install an app or a program, it makes some changes to your system. Sometimes, the files are stored in a specific folder within the Program Files utility, while other times, they create duplicate shared libraries called common files. Stubborn programs even get copied into the System32 and ProgramData directories. What’s worse is that Windows hides these files by default, so users remain unaware.
Hence, understanding these changes in the system registries can help you identify what is causing problems during uninstallation. Here are some popular reasons preventing such programs from being removed.
- Running background processes
- Admin authorization/ permission issues
- Issues with the Windows Installer services
- Corrupted registry entries
- Unfinished previous uninstallation.
- Anti-virus program interference.
Fortunately, you can treat these issues to successfully delete stubborn programs from Windows 10. Let’s discuss 10 tried-and-tested methods to delete all programs on Windows 10.
Method 1: Use Master Uninstaller
Where every method fails, third-party uninstaller apps are the way to go and delete programs on Windows 10. These programs are designed to pull all the program’s system traces and associated files to perform a successful uninstallation.
One such solution is Master Uninstaller. It works by repairing the damaged files of the program to be uninstalled and then deleting it from all the registries accordingly with zero input. Here is how you can use it to remove stubborn applications from your Windows 10.
Step 1: Register Your Email on Master Uninstaller
- Download and install the Master Uninstaller app from here and register your email.
Step 2: Uninstall Programs
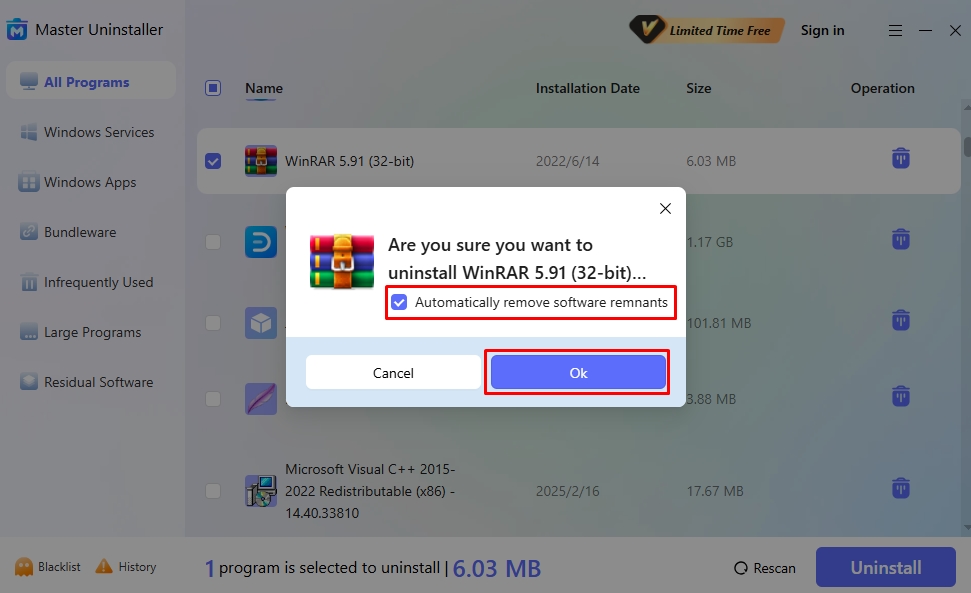
- Now, visit the All Programs section from the dashboard. Locate a program you want to delete and click Uninstall from the bottom-right corner.
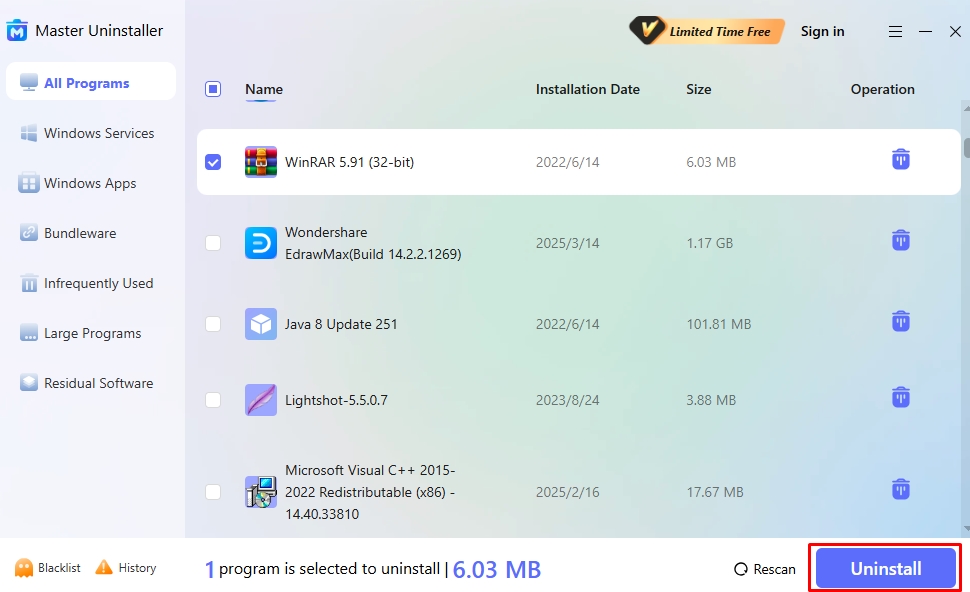
- Click Automatically Remove Software Remnants > OK. Congratulations, you’ve successfully deleted the program.
Master Uninstaller | A Smart Solution to Completely Uninstall Programs
Often, your system struggles to completely delete programs that intentionally resist the uninstall process. This is because these programs spread their associated files throughout the PC, corrupt the Windows Installer, and populate the registry, making it complicated to delete them using standard methods.
Hence, people prefer using a third-party uninstaller to remove all residues from the system. Master Uninstaller is an advanced solution that repairs the damaged files first, making it easier to access residues from the system. Here is what makes it better than other options in the market.
- Complete Program Deletion: Master Uninstaller deletes all program-associated files from your PC during deletion. It offers post-uninstallation cleaning to remove residues and traces from the system.
- Intuitive Interface: This uninstaller tool has an easy-to-use interface with clearly defined sections. This lets users quickly access and delete their desired program in one click, without technical expertise.
- Fast Operations: Master Uninstaller takes a few seconds to uninstall a program, regardless of size. For instance, deleting stubborn apps like Adobe CC with gigabytes of storage takes hardly any toll on the uninstaller.
- Blacklisting Function: Master Uninstaller has a blacklisting function that blocks stubborn programs from reinstalling repeatedly. After enabling this, the uninstaller will always ask for your permission before initiating installation.
- Bundleware Uninstallation: Some harmful software downloads additional apps without your notice when you install them. Master Uninstaller detects these apps and deletes them to keep your device clutter-free.
Method 2: End Background Processes Via Task Manager
Some programs encounter uninstallation problems, especially when running in the background. Using the task manager to end the background tasks might help. However, it does not actually uninstall apps but rather ends tasks, and then you can follow up by deleting programs using any other standard method.
Here is how you can do it.
Step 1: Locate Processes from the Task Manager
- Press Ctrl + Shift + Esc to open Windows Task Manager. Visit the Processes tab and select the program you wish to uninstall.
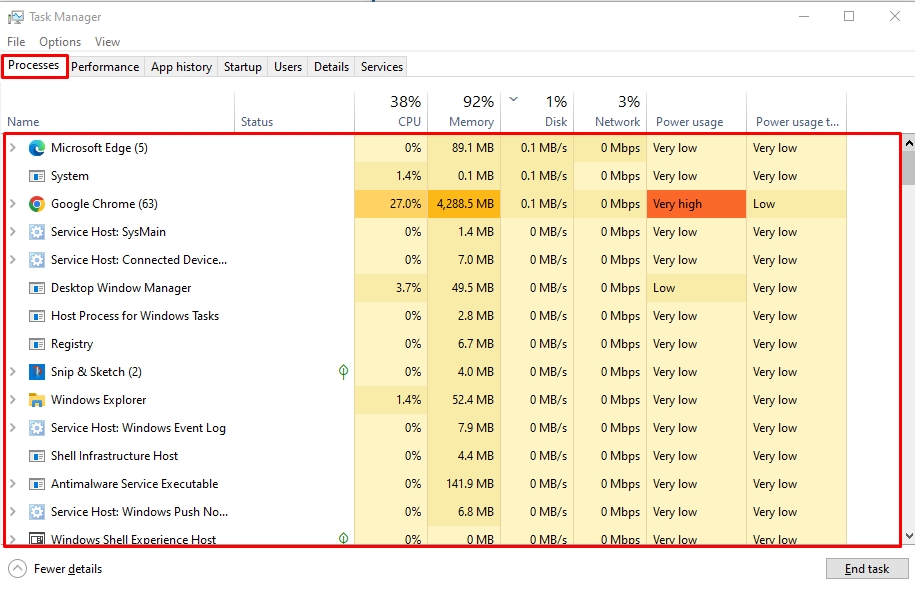
Step 2: End Background Processes
- Right-click this program and choose End Task. It will close all background processes of this program or app.
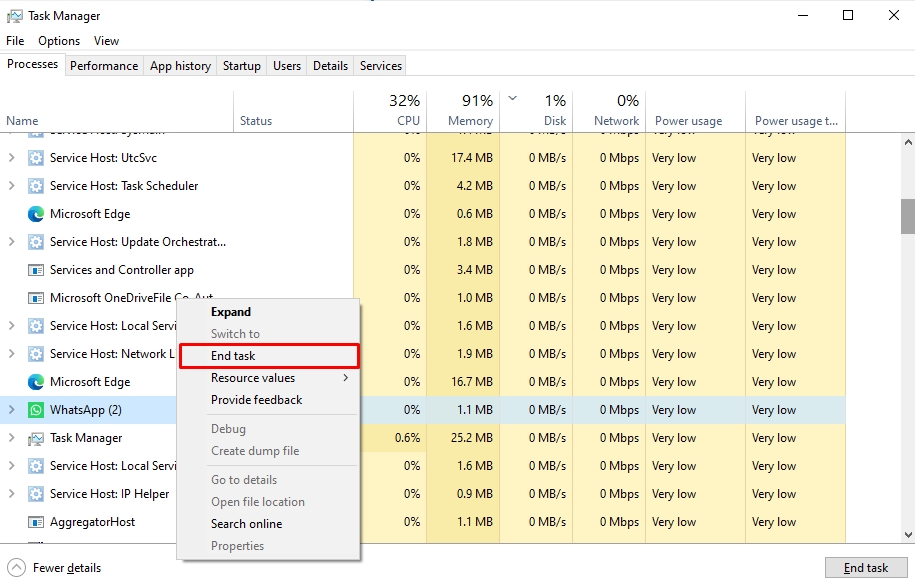
- Now, try uninstalling the program or app from the Start menu, Windows Settings, or Control Panel, however you like.
Method 3: Delete Programs Using Command Prompt
The command prompt helps delete programs with damaged files, but using it risks permanently removing other programs from your device. Here is a quick guide to using it to uninstall programs from Windows 10.
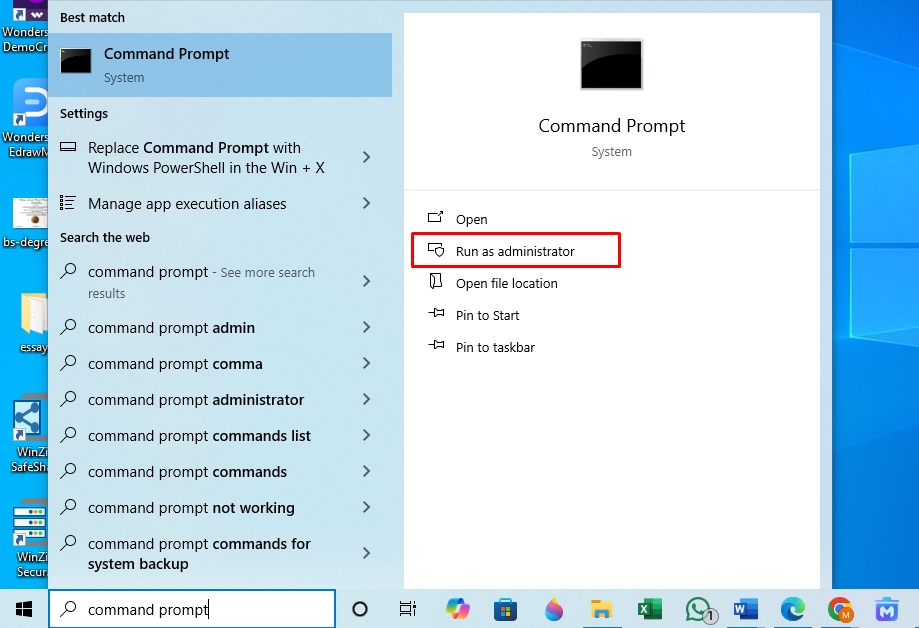
Step 1: Run CMD as Administrator
- Open the Command Prompt from the Start menu and run it as an administrator.
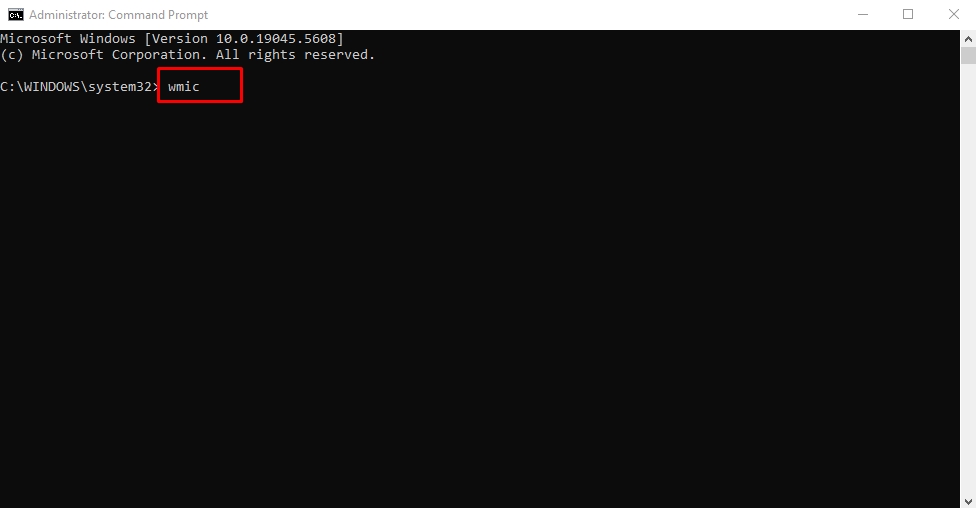
Step 2: Run the Uninstallation Command
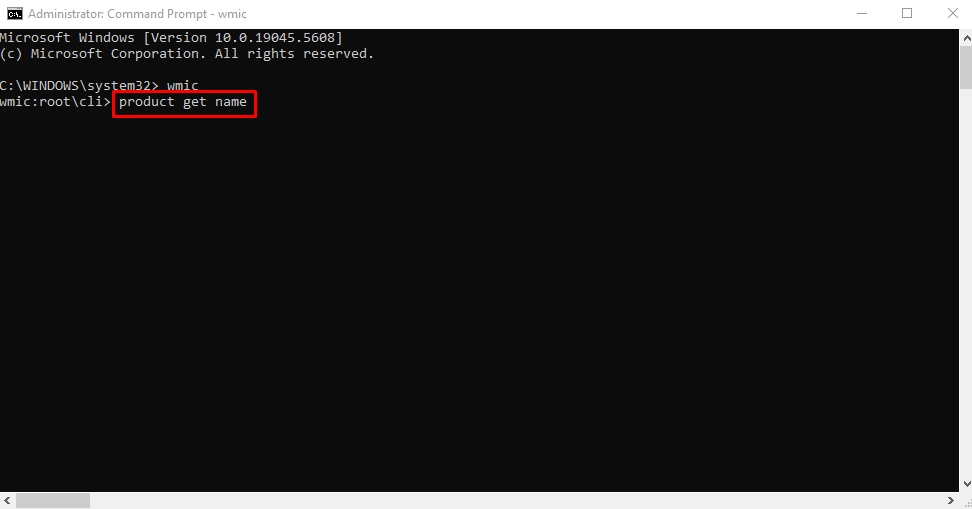
- Once the CMD windows open, type wmic and press Enter.
- Now, again run the command product get name and press Enter. It will display a list of installed programs (with accurate titles) on your PC.
- Locate the desired program and run the following command to uninstall it;
product where name = product name call uninstall.
Change the program name to the name of the program to be deleted. For instance, the command to uninstall IBM SPSS Statistics would be: product where name = “IBM SPSS Statistics 25” call uninstall.
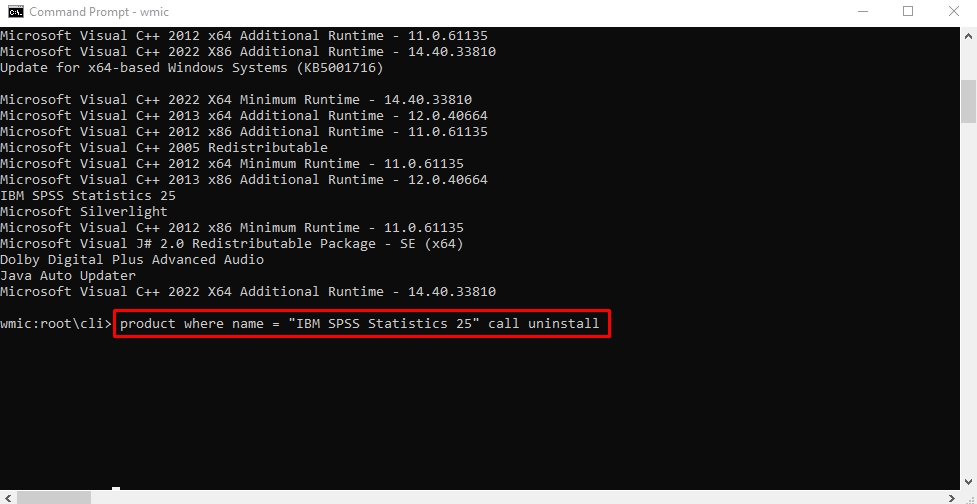
- Next, type Y to complete the uninstallation. Once the program is deleted, you will receive the confirmation Method Execution Successful.
Method 4: Force Uninstall Apps Using Registry Editor
Registry Editor is a utility of Windows 10 that stores changes and preferences made by installed programs. You may use it to edit settings and delete stubborn programs, but it can be tricky. Incorrect registry editing can cause system errors or crashes. So, be extra mindful while following these steps to manually remove a program from Windows 10.
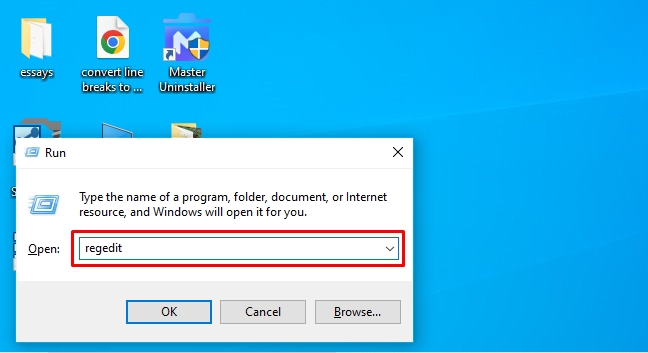
Step 1: Open the System Registry
- Press Windows + R to open Run. Type regedit in the search box and press Enter.
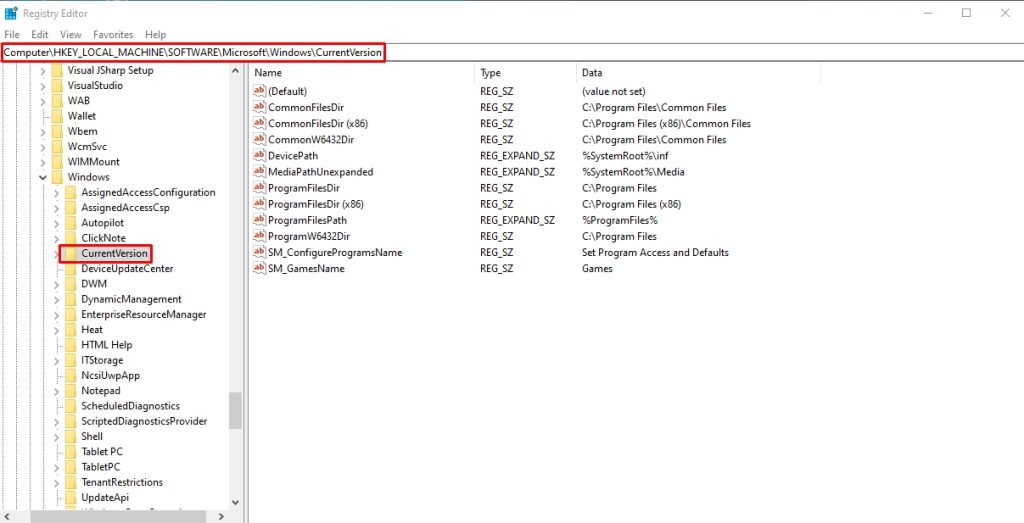
Step 2: Locate Programs from the Registry
- Under the HKEY_Local_Machine, select Software > Microsoft > Windows > CurrentVersion.
Step 3: Uninstall Programs
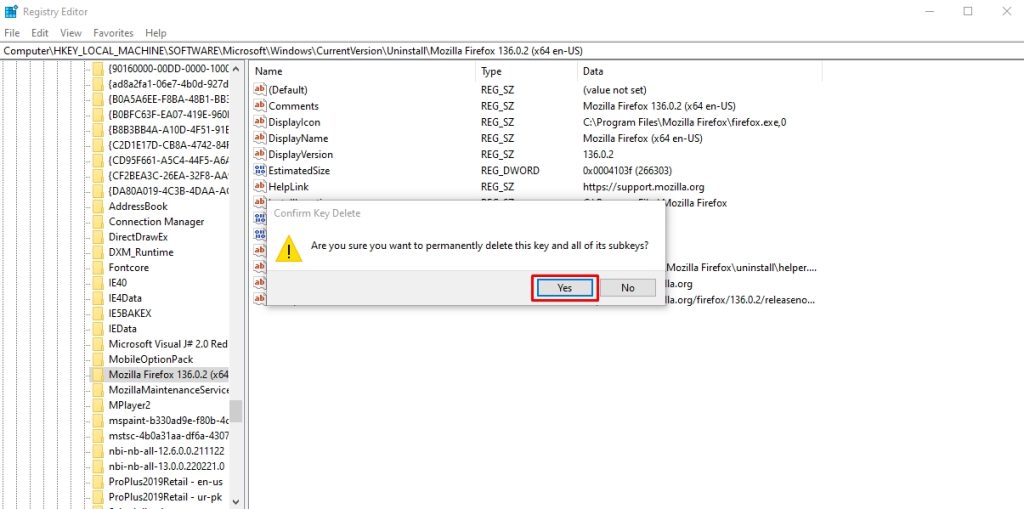
- Select Uninstall and find the program you want to remove under this tab. Right-click this program and click Delete.
- Click Yes to confirm, and that’s it. Restart your computer, and you’ve successfully uninstalled this program.
While deleting a program via the registry editor, you must also delete its associated keys. Typically, these registry keys are automatically removed. But if this is not the case, you can do it manually.
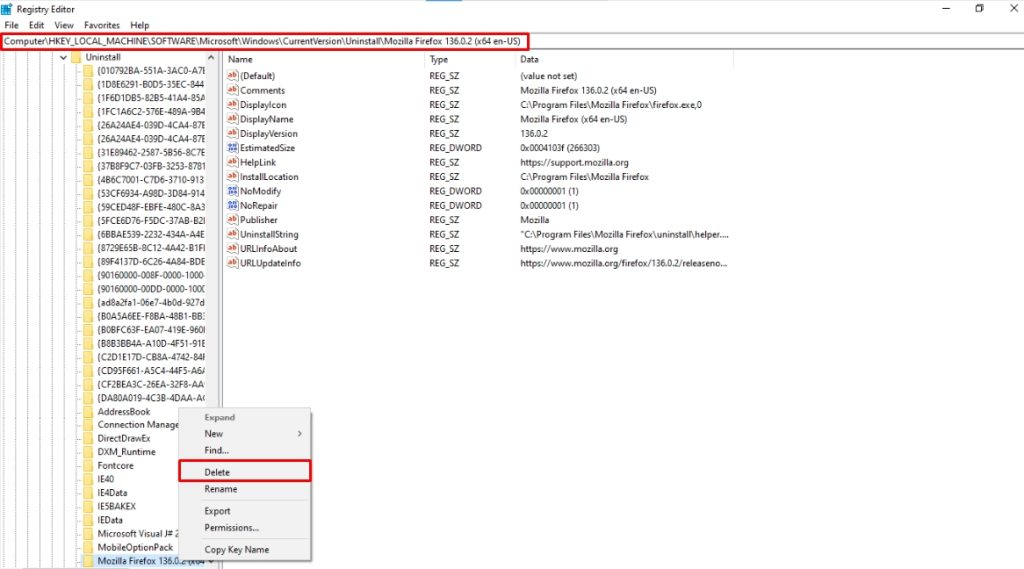
Step 1: Locate the Uninstall Tab
- While you are present on the registry editor, click HKEY_Local_Machine > Software > Microsoft > Windows > CurrentVersion > Uninstall.
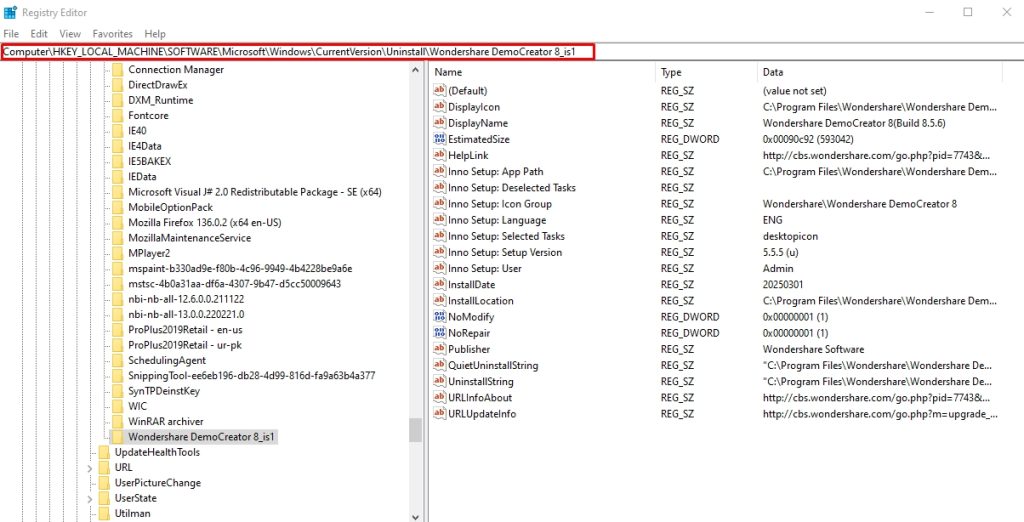
Step 2: Delete Program’s Registry Keys
- Locate the keys associated with the program you wish to remove. Right-click it and select Delete.

Method 5: Uninstall the Programs in Safe Mode
Sometimes, the uninstalling process of a program interferes with third-party processes, causing it to fail. The solution to this problem is to delete this program while the system is booted into Safe Mode.
Step 1: Enter Safe Mode
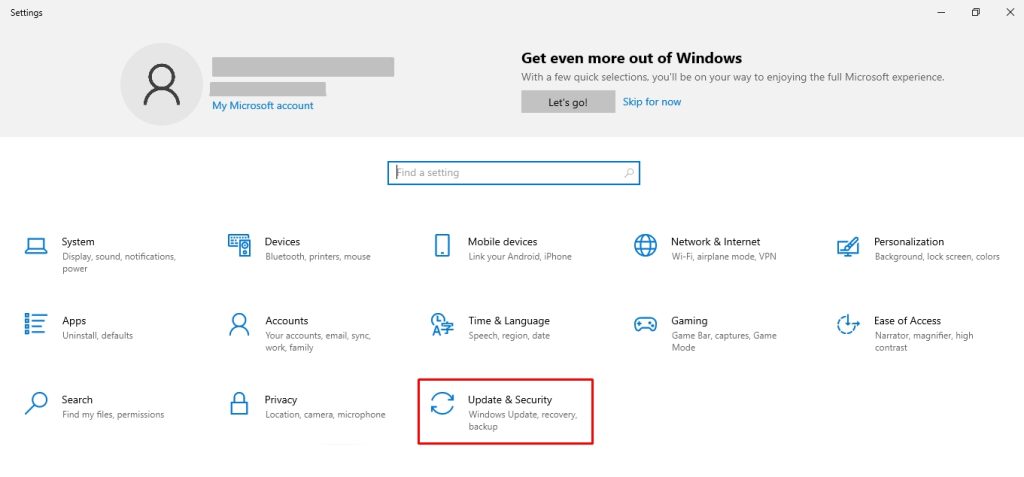
- Open Windows Settings by pressing Windows + I, and navigate to the Update and Security tab. Alternatively, go to the Start menu to access the Power options, hold Shift, and click Restart simultaneously to enter Safe Mode.
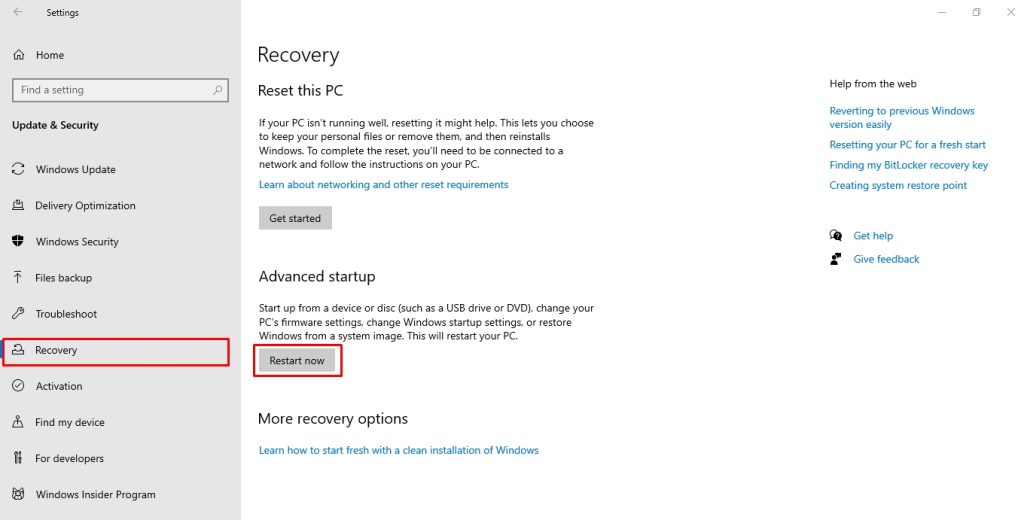
- Visit the Recovery menu from the left side and click Restart Now under the Advanced Startup section.
Step 2: Restart PC in Safe Mode
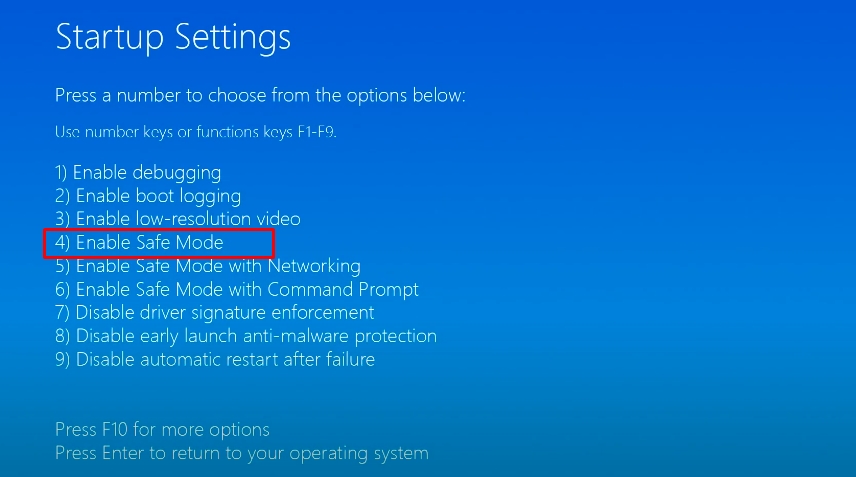
- Once the computer has initiated Safe Mode, click Troubleshoot > Advanced Options > Startup Settings > Restart. This will restart your PC in safe mode.
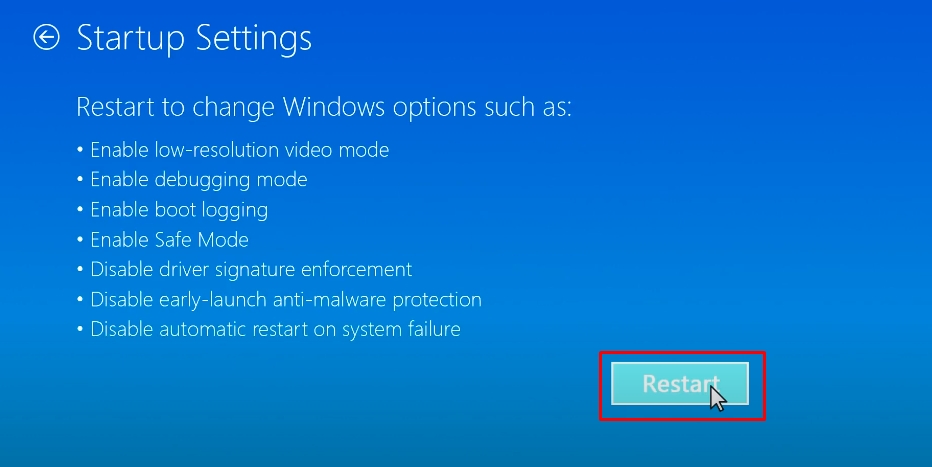
- From the Startup Setting menu, press 4.
Step 3: Uninstall Programs from the Control Panel
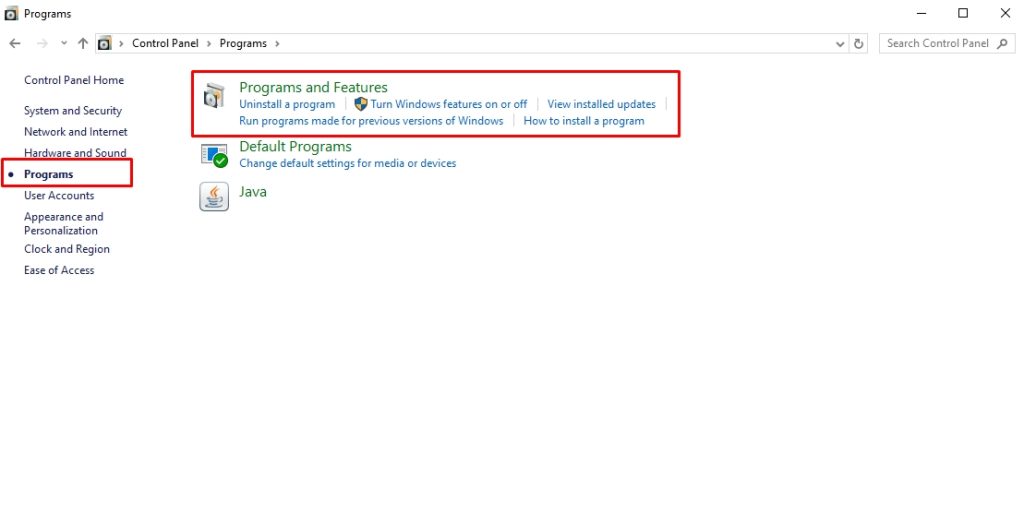
- Once you have booted into safe mode, open the Control Panel from the Start button. Access the Programs tab and click Programs and Features.
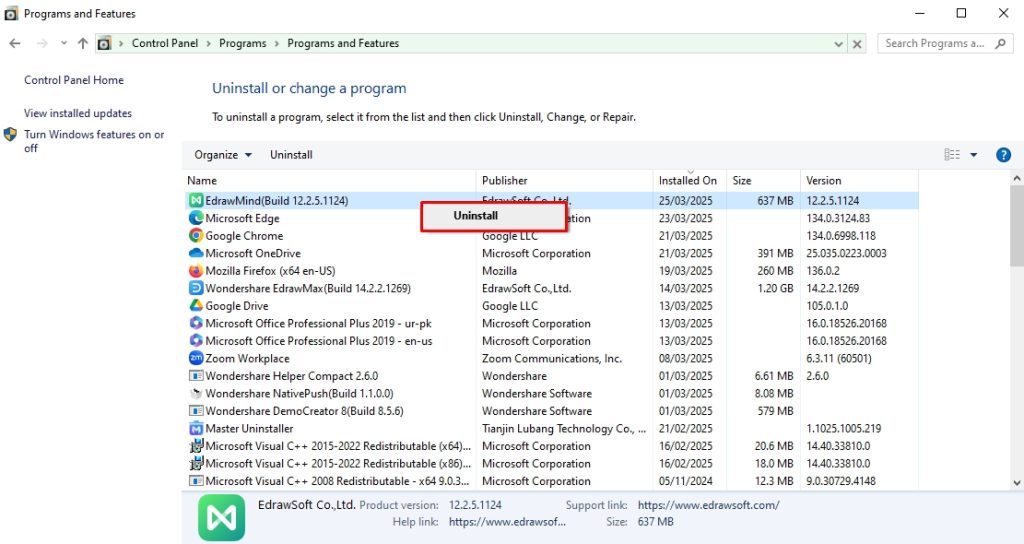
- Right-click the program you wish to delete and click Uninstall. Confirm the deletion, and you are done.
Method 6: Use the Manufacturer's Uninstaller Tool
Most software you install on your PC comes with its uninstaller file. You can easily access this file from the application root folder. Follow these simple steps to access the software uninstaller and delete programs on Windows 10.
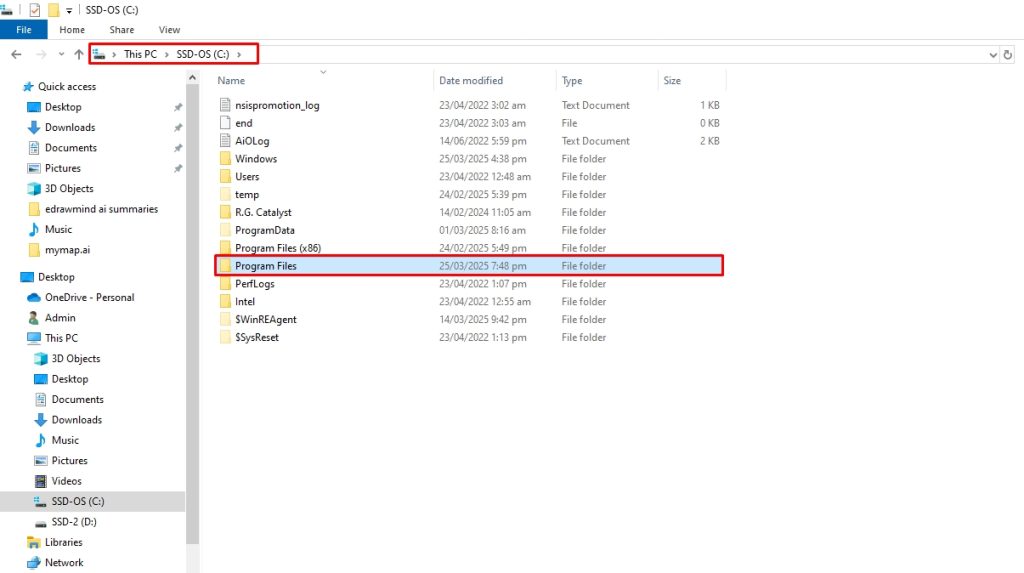
Step 1: Locate Program Files
- Navigate to the PC directory where the program is installed. You can usually find it in the program files. Open File Explorer > This PC > Local Disk > Program Files to access this.
Step 2: Search for the Manufacturer’s Uninstaller File
- Review the contents of the application folder and locate the uninstaller.exe file.
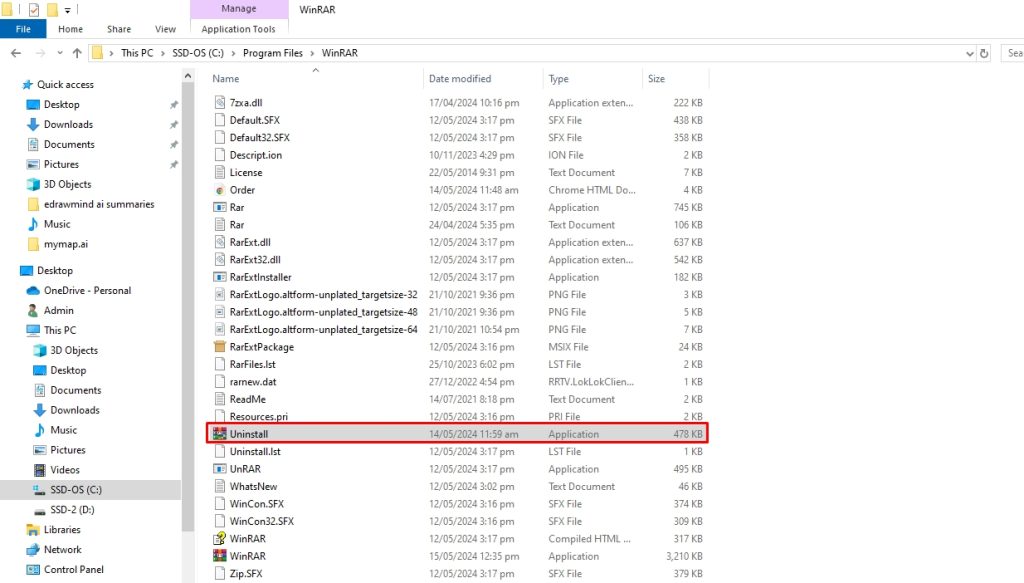
- Double-click this uninstaller and launch it. Follow the instructions to complete the process.
Method 7: Set Up a System Restore Point
Restoring your Windows 10 PC to a previous state would automatically undo recent changes, such as installing a program. However, it may risk losing personal data, so you must back up all important data before setting up a system restore. Here is how it goes.
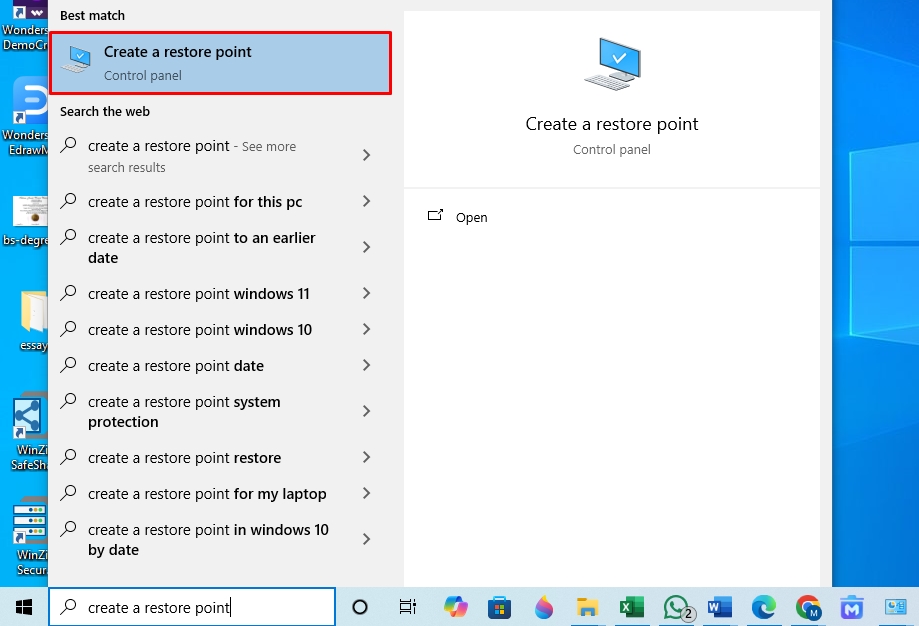
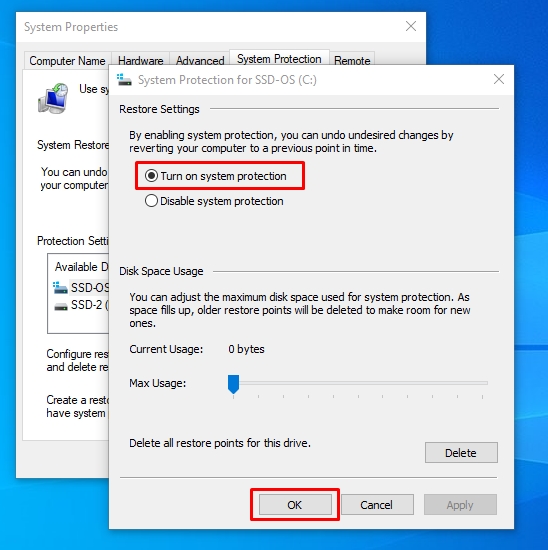
Step 1: Create a Restore Point for Your System
- To enable the restore point, search for Create a Restore Point from the Start menu.
- Click Configure under the Protection Settings in the System Properties window.
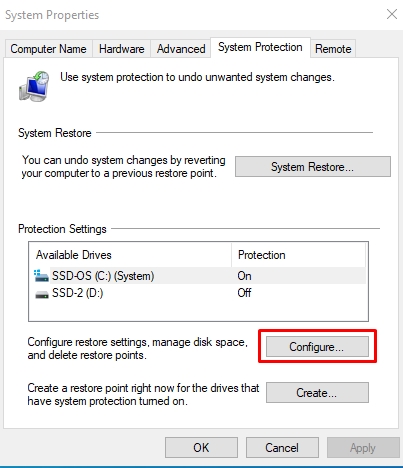
- Select Turn on System Protection from the Restore Settings and click Apply.
Step 2: Activate System Restore
- Now, you can quickly reverse the changes made to the PC, such as installing a new app or program. To do this, open the Restore Point menu and click System Restore under the System Protection tab.
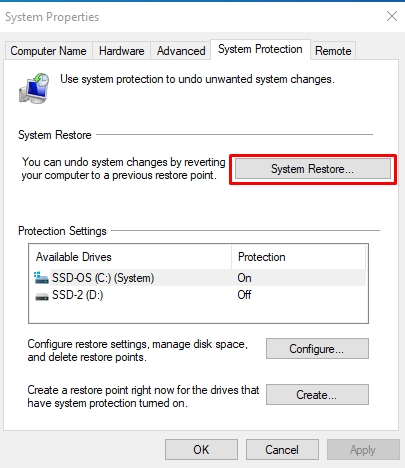
- Follow the instruction prompt to complete the recovery.
Method 8: Use Microsoft Install/ Uninstall Troubleshooter
Microsoft has its dedicated uninstaller and installer troubleshooter to resolve issues relevant to overwriting or changes made by programs into the system. You can use it to delete hard-to-remove programs. Follow these simple steps to do this.
Step 1: Download the Microsoft Install/ Uninstall Troubleshooter
- Download the Microsoft Program Installation and Uninstallation Troubleshooter from here.
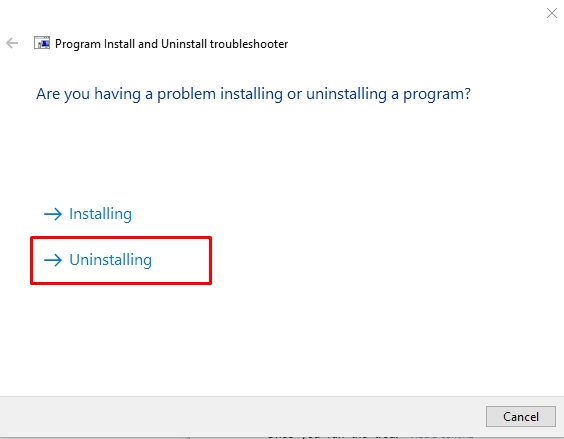
Step 2: Uninstall Programs Using Troubleshooter
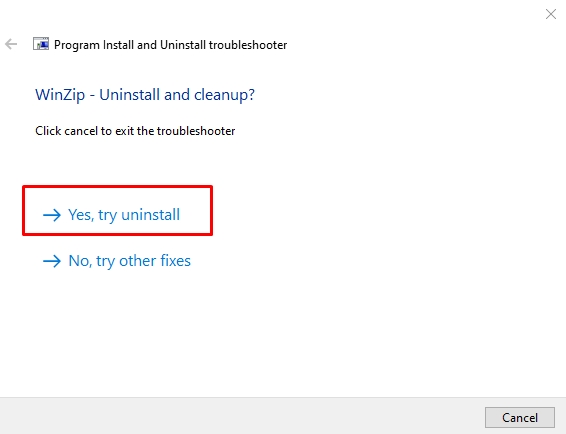
- Once you run the troubleshooter, it will ask if you have problems installing or uninstalling a program. To do so, click Uninstalling.
- It will display a list of installed programs on your computer. Select the program you want to delete and click Next.
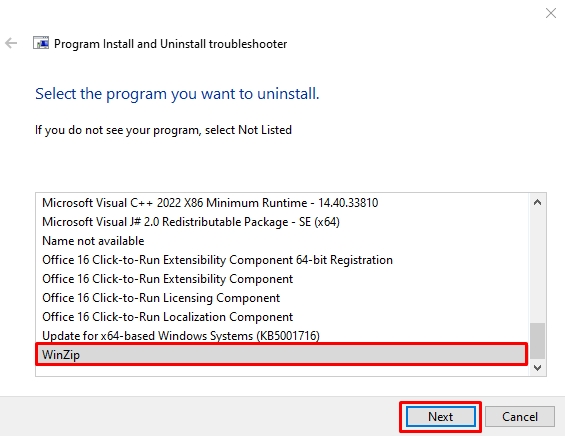
- Click Yes, and try Uninstall from the pop-up menu. That’s it. The program has been deleted.
Method 9: Restart the Windows Installer
Windows Installer is your system’s crucial utility for installing and uninstalling programs. So, if it is disabled, even accidentally, you will face issues deleting a program. Hence, you must restart or re-register the Windows installer to resolve the issue.
Step 1: Restart the Windows Installer
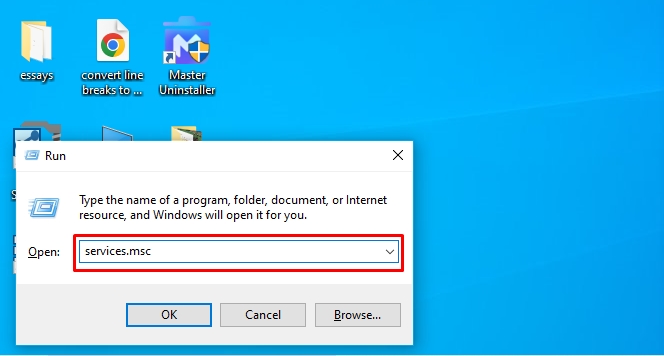
- Press Windows + R to open Run. Type services.msc in the search box and press Enter.
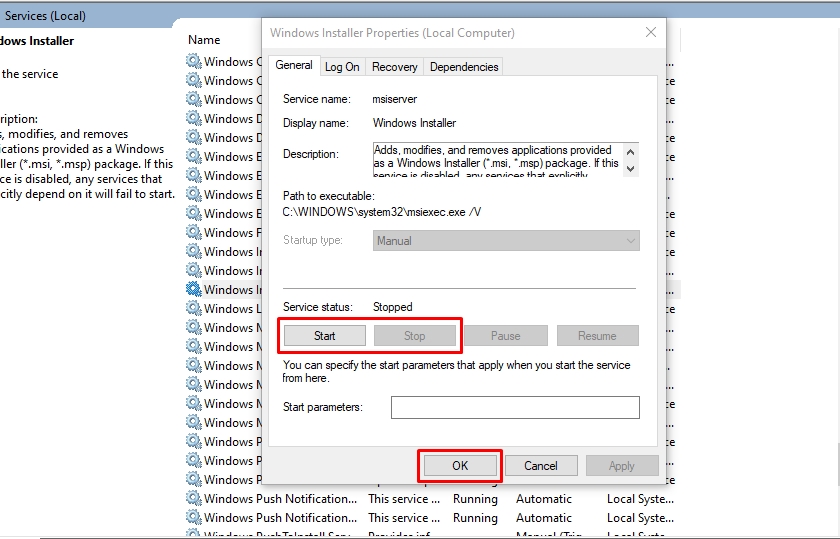
- Right-click the Windows Installer service from the pop-up menu and click Properties.

- Now, click Stop and then Start. Apply the changes by clicking Yes.
Now, the program should be uninstalled as usual. However, re-register the Windows Installer service if it has not been deleted. Here is how it goes.
Step 2: Re-register the Windows Installer
- Run the Command Prompt as an Administrator from the Start menu. Once opened, type msiexec /unreg, and press Enter.
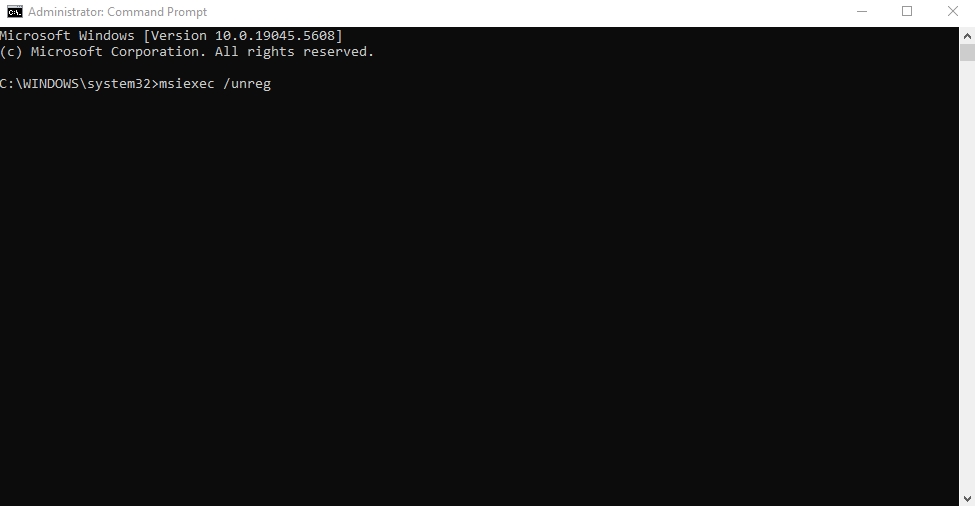
- Next, type msiexec/ regserver and press Enter.
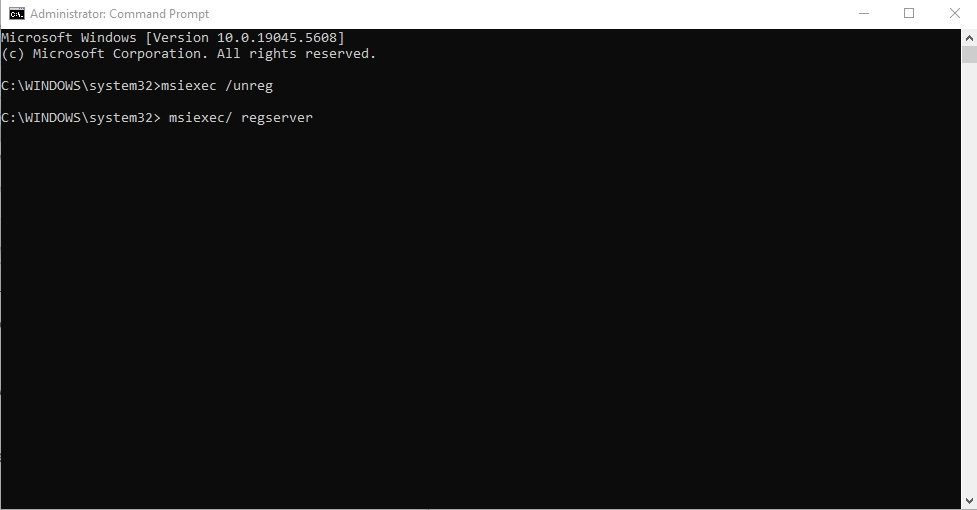
- You will be able to uninstall the program now.
FAQs
1. The uninstall process interferes with third-party processes.
2. The program has processes running in the background.
3. You do not have admin access to uninstall the specific program.
4. The Windows Installer or system registry is corrupted.
Final Thoughts
Imagine this: You’ve installed a new app and have been using it for quite some time. You decide to uninstall it, only to find out that it refuses to delete with the standard Windows method.
Now, you may be wondering how to delete programs on Windows 10 that won’t uninstall otherwise. While there are many ways to do so, the best possible method is using a third-party uninstaller like Master Uninstaller. It requires zero effort and removes all the program-associated files, system traces, and residues from the PC within seconds.
So, give it a try and see how it works for you.

-

Simple and Practical: Easily uninstall unwanted software.
-
Thorough Cleanup: Completely remove residual files.
-
Blacklist Protection: Identify and block malware and adware.