


Working on a slow and sluggish computer can frustrate anyone. Have you ever faced this situation and discovered that your drive is overloaded? While it is okay in rare cases when performing disk-intensive tasks, constantly seeing 100% disk usage is problematic for your PC’s health.
Hence, you must fix it using the right methods. But this is only possible when you have identified the reason behind the overloaded drive. Here is a quick rundown of the common causes of disk 100 usage in Windows 10 and how to solve it.
What is Disk Usage?
Simply put, disk usage is the percentage of the space the computer uses from your hard disk to operate and carry out routine tasks. It is related to the performance and speed of your system rather than simply its storage capacity.
This computer disk uses metrics to evaluate the load on the drive and items that consume most space. However, when your Windows Task Manager shows 100 percent disk usage, it indicates that your drive is experiencing speed and performance issues. Identifying the right problem and finding its solution is crucial for your system’s normal functioning.
Some common reasons behind 100 disk usage include,
- High CPU usage.
- Background processes and temporary files.
- Fragmented disk and logical disk flaws.
- Faulty hardware.
How to Identify the Cause of 100% Disk Usage Windows 10?
The most effective way to identify what is causing a 100 disk space usage in Windows 11 is through the Task Manager. This system utility shows the items increasing the disk usage, so you know which issue to resolve and how. Here is how you can do it.
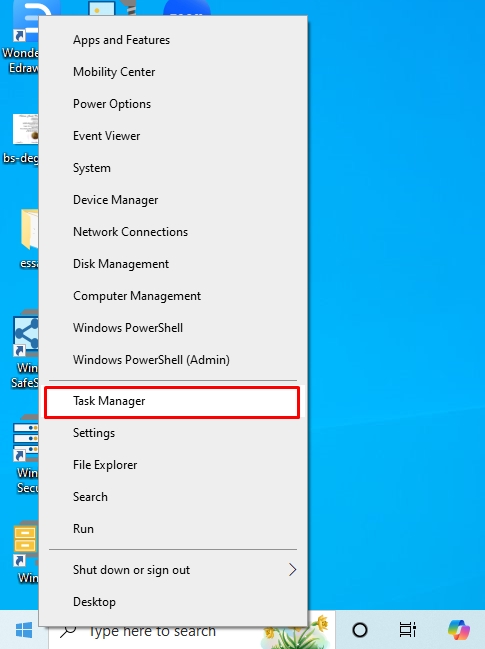
- Open Task Manager from the Search menu.
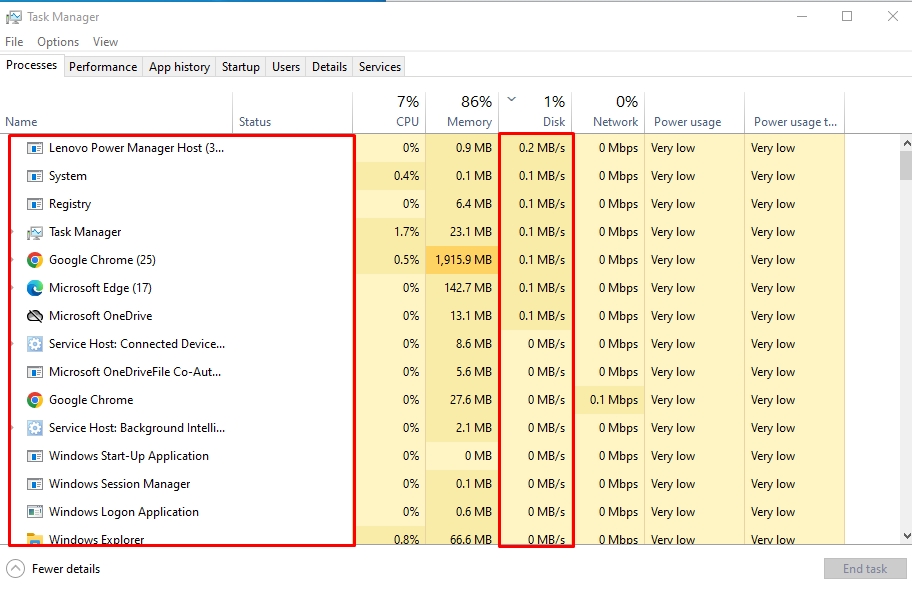
- Click the Disk tab from the dashboard to see all running processes that are taking up the disk space.
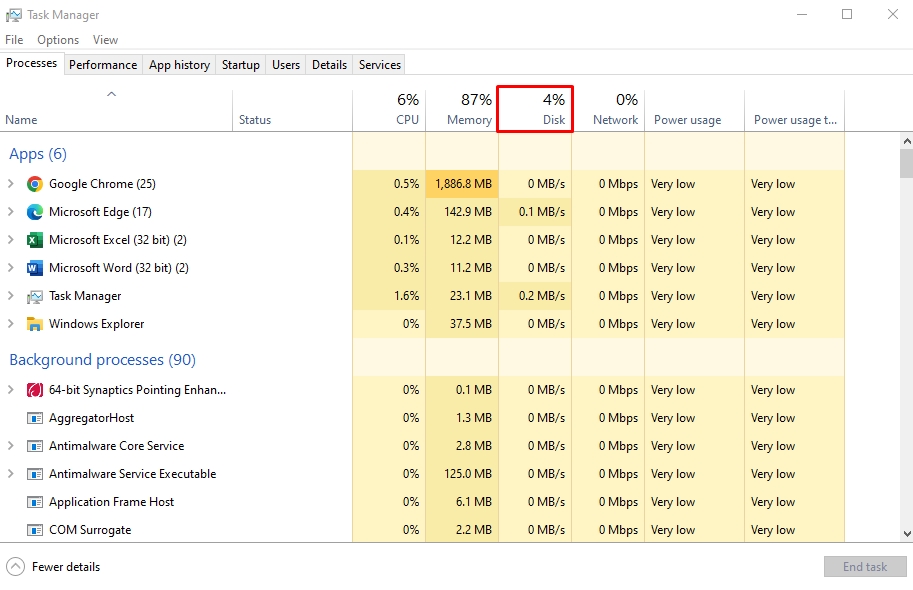
- Look for orange components, as they usually require more storage per second than usual. Consider these items problematic and find a solution using the quick fixes below.
11 Quick Fixes for 100% Disk Usage Windows 10 | Quick and Easy
Check out these 11 Windows 10 100 disk usage fixes and resolve your PC’s performance issues.
Method 1: Update Your Windows
Microsoft constantly releases updates to fix bugs and security issues, which download automatically. However, these updates stay in standby mode until you install them, which takes up many of your disk resources.
Additionally, Windows updates can resolve most problems with 100% disk usage. Here is how to fix 100% disk usage for Windows 10 after a fresh install.
- Open Windows Settings by pressing Windows + I and visit the Update and Security tab.
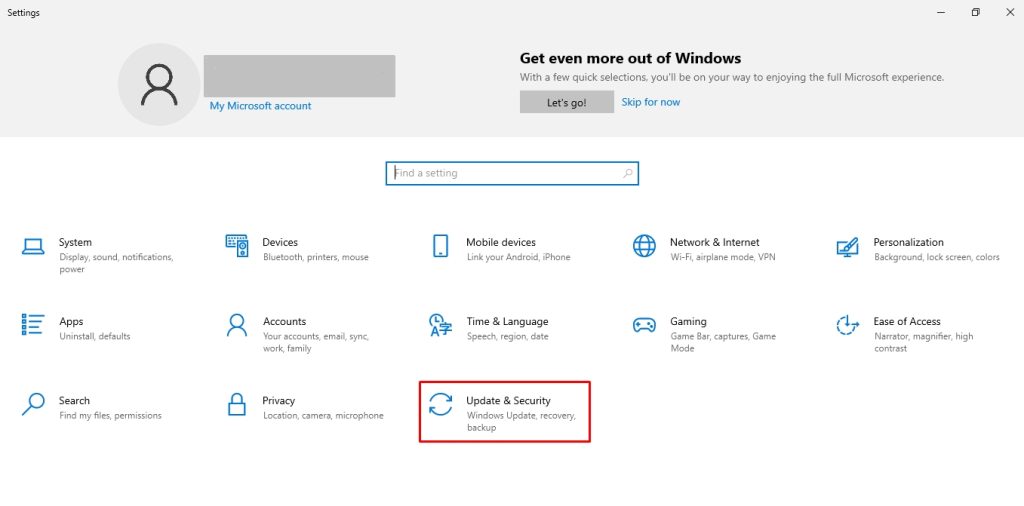
- From here, click Window Updates > Check for Updates. You can install them depending on the status of the update.
Method 2: Reduce Unused and Startup Apps
Some programs in your computer run on startup by default, consuming resources and adding to Windows 10 disk storage. Limiting these programs is an easy and effective way to lower disk usage. Follow these simple steps to do this.
- Press Windows + I to open Windows Settings and visit the Apps tab.
- Select Startup and Toggle Off the apps you do not want.

Moreover, you can delete these apps if they are no longer in use to free up system resources. Here is how it goes.
- Open Run by pressing Windows +R. Type shell:startup common in the search box and press Enter.
- This will show you startup items on your computer. Right-click the desired program to delete it.
While this is a simple way of deleting startup apps, it does not entirely remove the program’s background processes and registry traces. Here, using a third-party uninstaller like Master Uninstaller can help.
This program is designed to uninstall apps, their associated files, and residues from your PC with just one click. Here is how to use it to uninstall apps.
- Download Master Uninstaller from here and register your email.
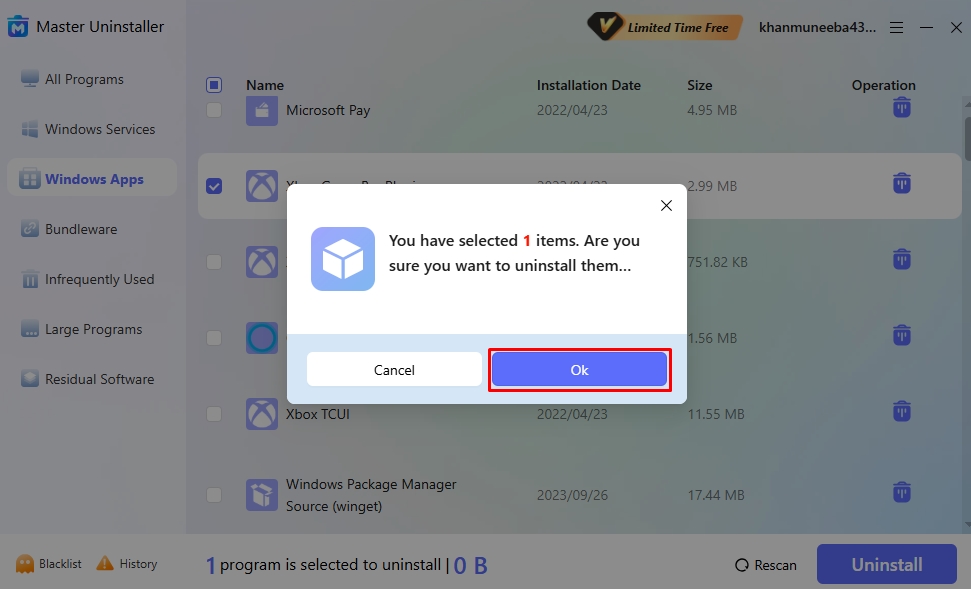
- Visit the Windows Apps from the dashboard, choose your desired app, and click Uninstall.
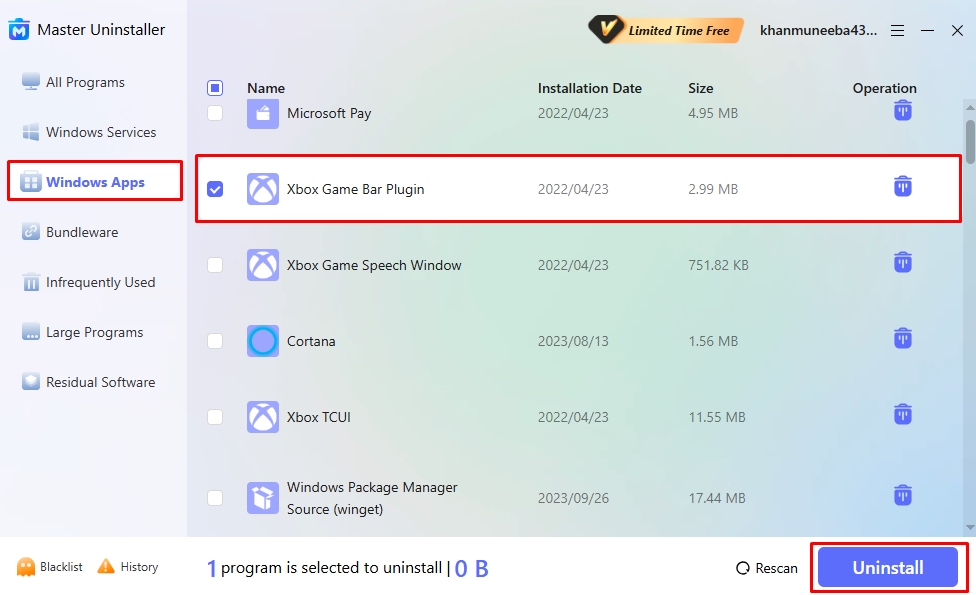
- Click OK to confirm uninstalling the program.
Method 3: Disable Windows Search
Windows Search helps you find programs and utilities in a computer. However, a bug in Windows 10 causes a search loop that pulls items from the search engine. This takes up the disk space and slows down your computer. Hence, the only solution is to limit Windows Search so it only retrieves items from local files. And here is how it goes.
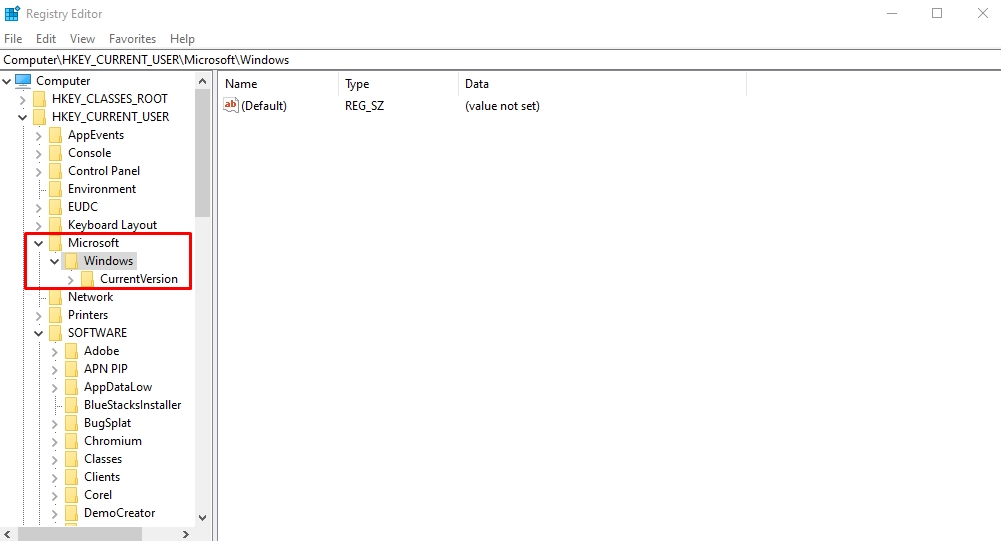
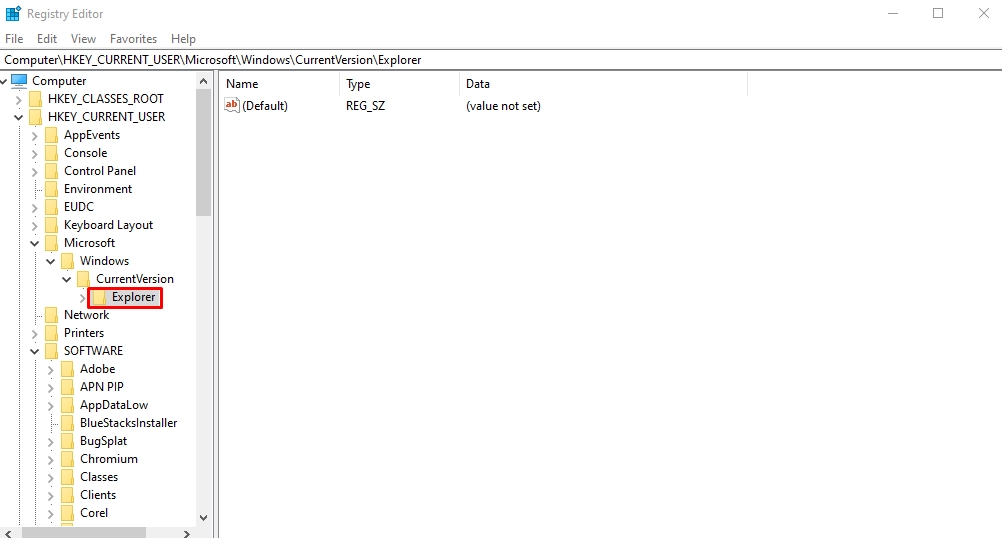
- Visit the Start menu and type Registry Editor in the search box. Once opened, double-click Microsoft and double-click Windows.
- Right-click CurrentVersion and select New > Key to create a sub-folder.
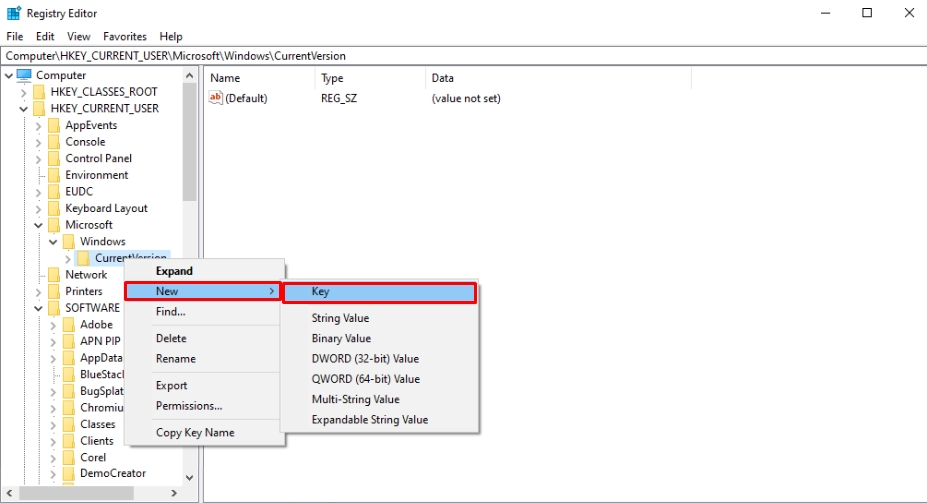
- Allocate the name Explorer to this folder.
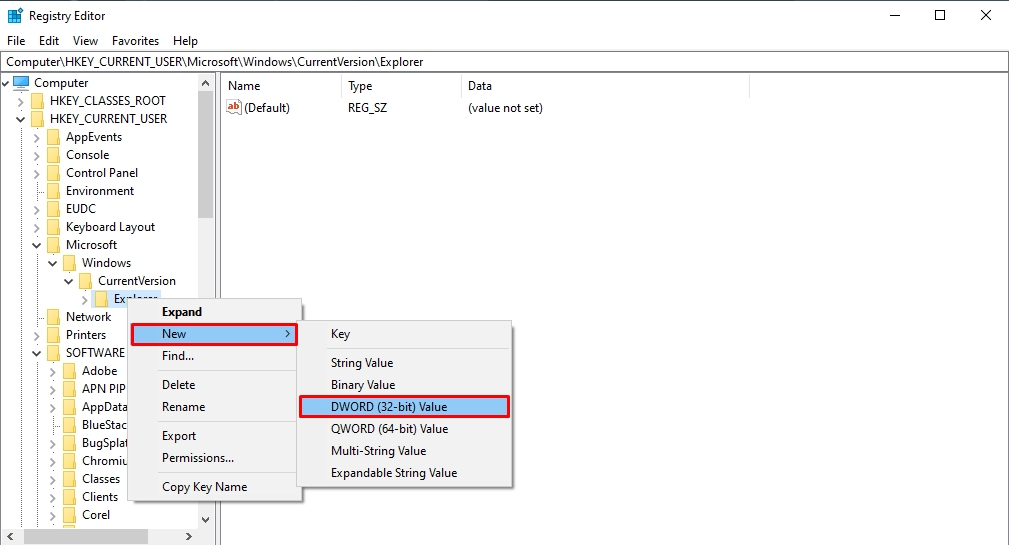
- Right-click Explorer and select New > DWORD (32-bit) Value to create a new registry under this name.
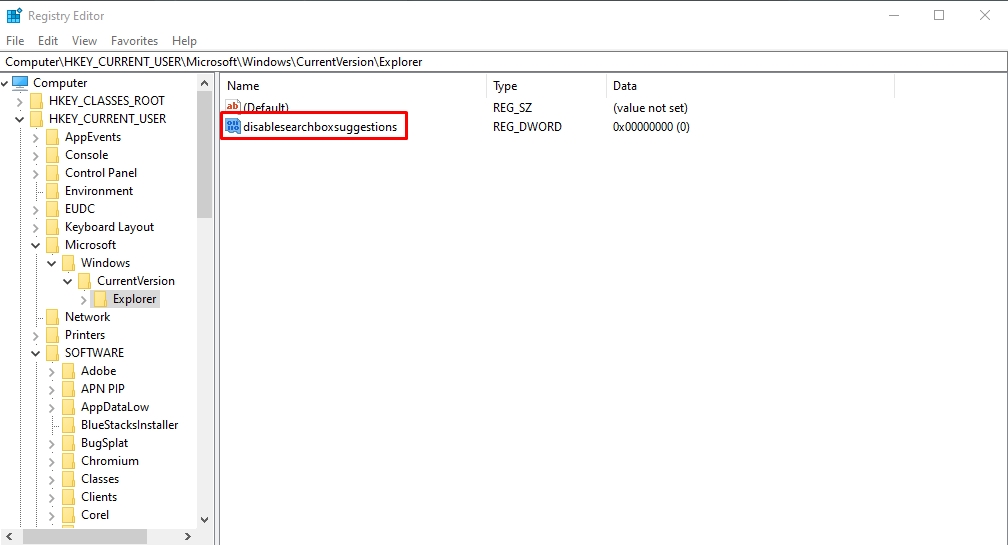
- Now, name this new entry DisableSearchBoxSuggestions.
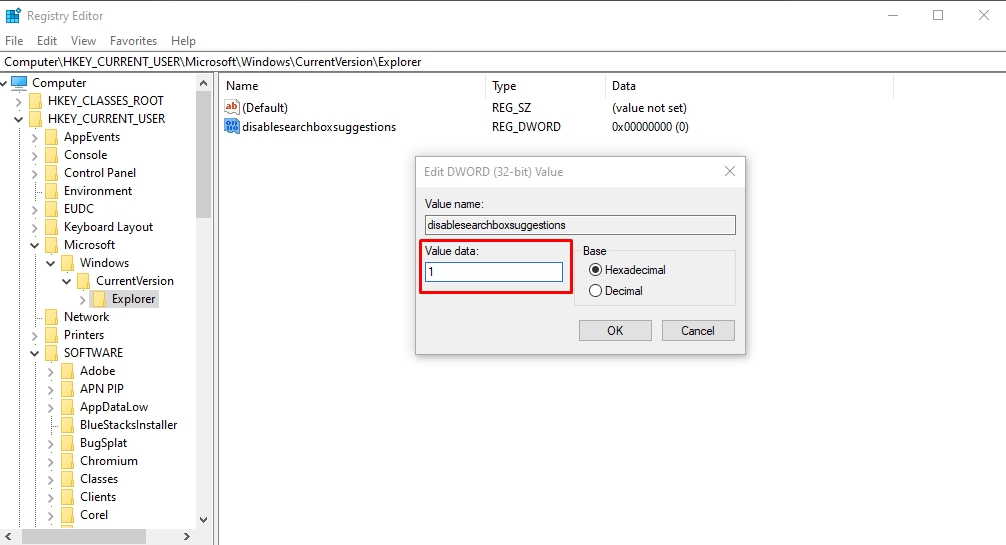
- Right-click this entry and click Modify. Type 1 under the Value Data tab and click OK.
- Finally, restart your computer. Now, the Windows Search will only find items from your local computer, speeding the process and reducing disk usage.
Method 4: Reset Virtual Memory Windows 10
Virtual memory is a Windows storage management technique in which the RAM borrows storage from the hard disk if it has already used its own. This strategy compensates for the overloaded, already smaller RAM by temporarily transferring some of its files to the disk. However, it can also contribute to 100 percent disk usage.
Hence, the best solution is adding more RAM, which might not be possible for everyone. In this case, resetting your virtual memory might help.
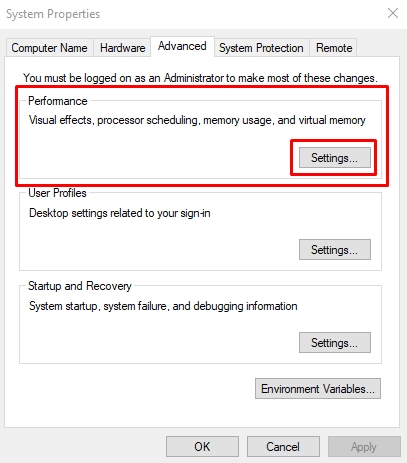
- Visit the Start menu and open Advanced System Settings. Under the Advanced tab in the System Properties menu, click Performance > Settings.
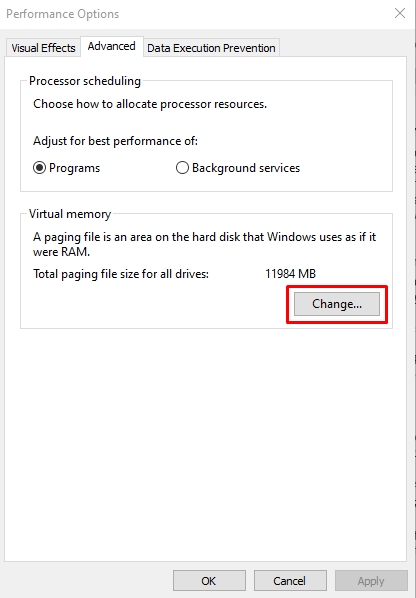
- Select Change from the Virtual Memory section under the Advanced tab.
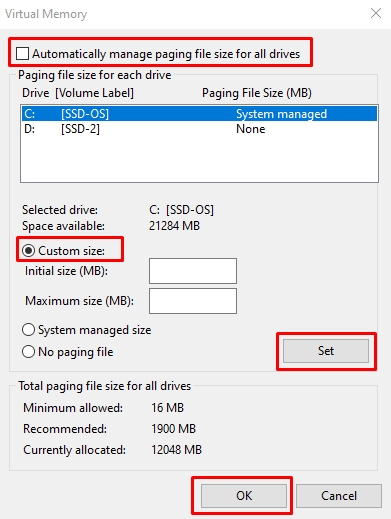
- Now, untick the Automatically Manage Paging File Size for All Drivers option, select Windows (System Managed), and choose Custom Size for the virtual memory. Once done, click Set > OK.
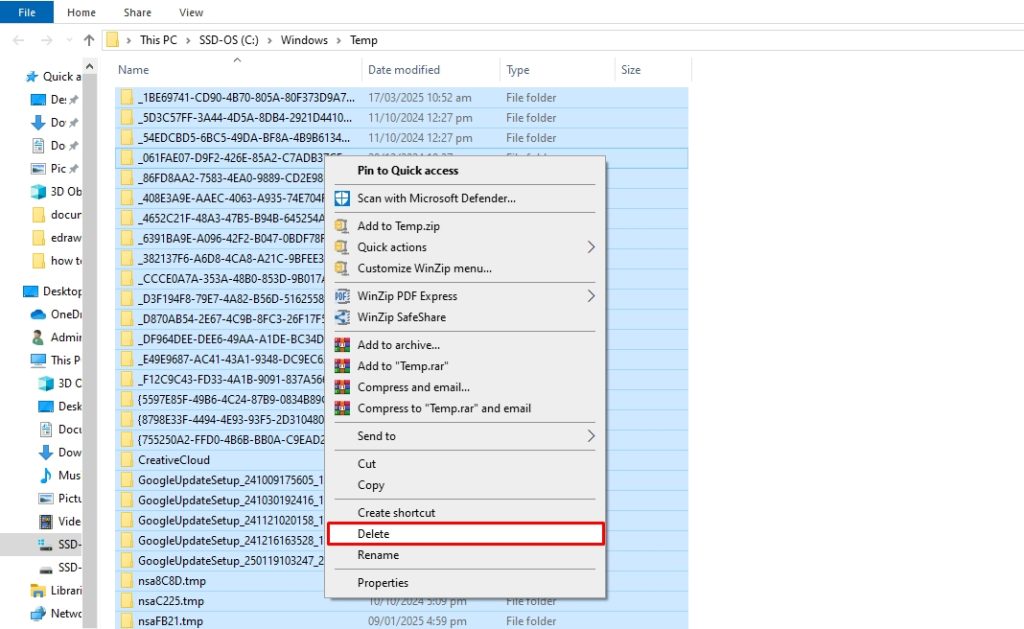
Now, you can delete the temporary folder files.
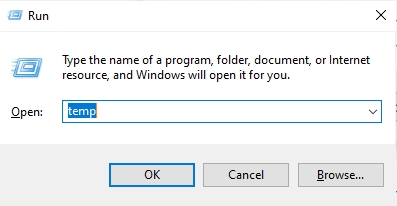
- Open Run by pressing the Windows + R keys. Type temp in the search box and press Enter.
- Select all Temp files and right-click to delete them.
Congratulations, your virtual memory is now reset.
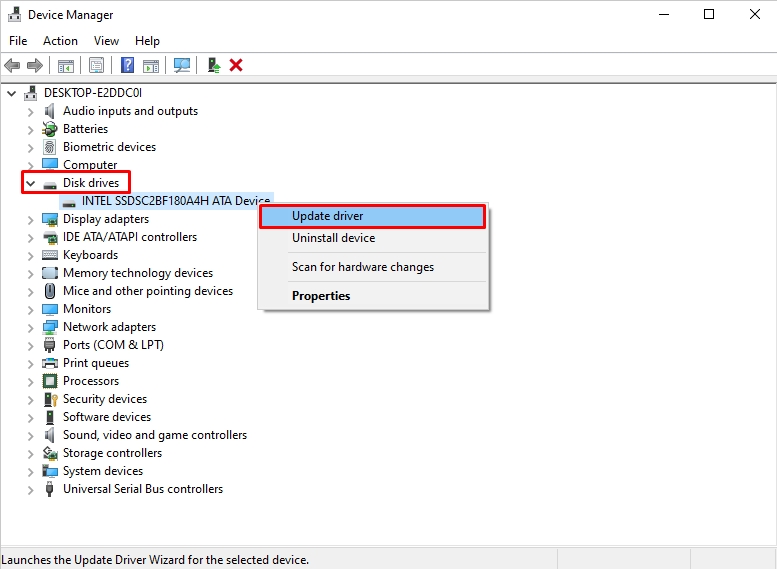
Method 5: Update Device Drivers
Your computer drivers control all the hardware, including your hard drive and disk controller. However, an outdated driver is prone to bugs and security issues, which can contribute to a disk 100 usage Windows 10 issue. So, follow these simple steps to update your device drivers.
- Open the Start menu and type Device Manager in the search box. Once opened, double-click the Disk Drives and choose Update Driver.
- Click Search Automatically for Drivers from the pop-up menu.
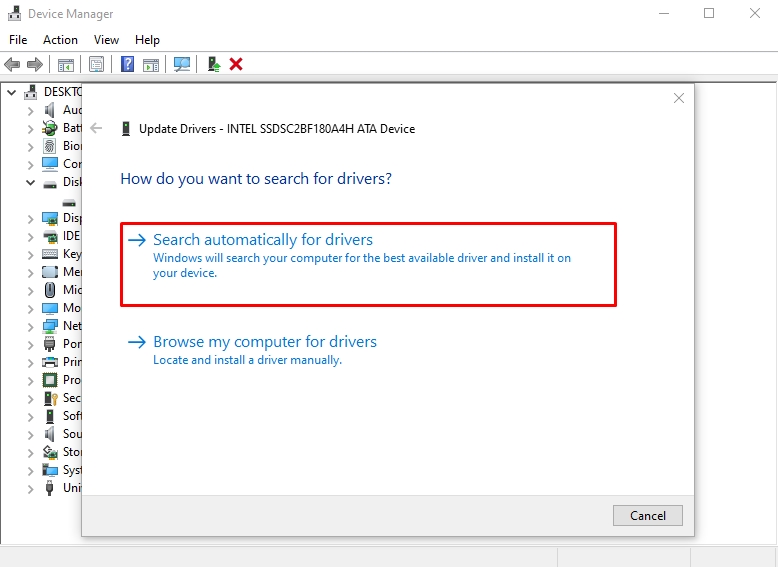
- Windows will now search for the updated driver and install it accordingly.
Method 6: Disable Superfetch
Superfetch improves your computer's RAM performance by anticipating the program you will use and preloading its data. This reduces load time and boosts speed. However, when you don’t have the latest hardware, this feature can consume significant disk usage and result in disk performance issues.
Hence, the only solution is to disable Superfetch. Here is how it goes.
- Open Run by pressing Windows + R. Next, type services.msc in the search box and click OK.
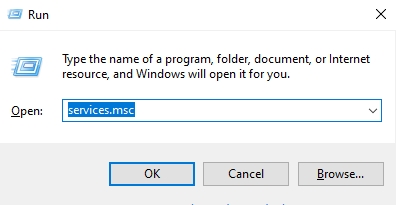
- Visit the Services (Local) menu, double-click SysMain under the Name menu, and choose Disable.

- Click OK, restart your computer, and the Superfetch is gone.
Method 7: Delete Temporary Files
Deleting temporary files is yet another effective way of freeing up system space. Often, these files are infected with bugs, making hundreds and thousands of copies, which adds to your 100% disk usage issues in Windows 10. Here is how you can remove temporary files from the PC.
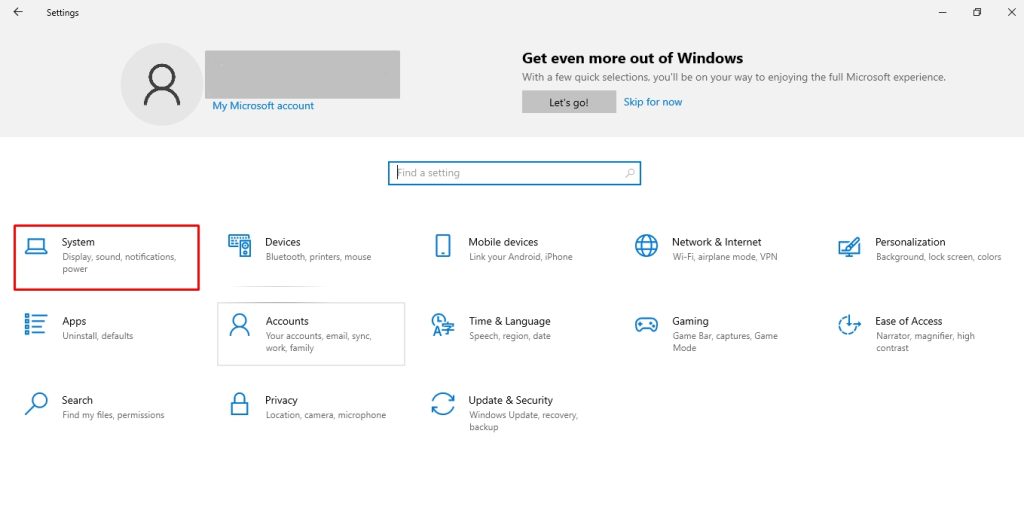
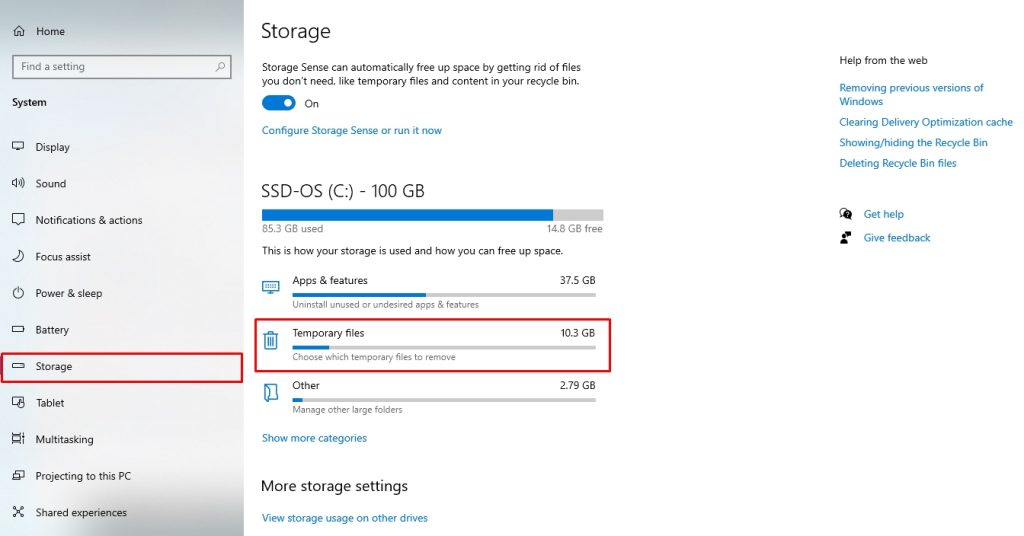
- Open your computer’s Settings (Windows + I) and select System.
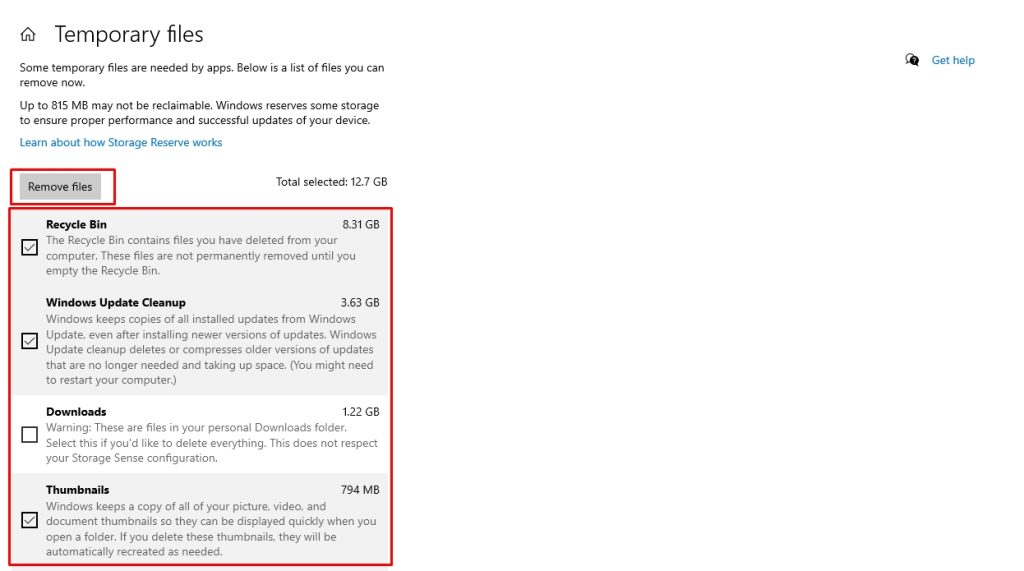
- Under the system Storage tab, choose Temporary Files.
- Select what type of temporary files you want to delete and click Remove Files to confirm deletion.
Method 8: Adjust Energy Options
Windows 10 has various energy settings to help you save battery, maintain the CPU’s temperature, and improve system performance. Our PC is set to a Balanced setting by default. However, if you are constantly experiencing a disk 100 usage in Windows 10 and no method has yet been successful, switching to a High-Performance mode might help.
Follow these steps to do it.
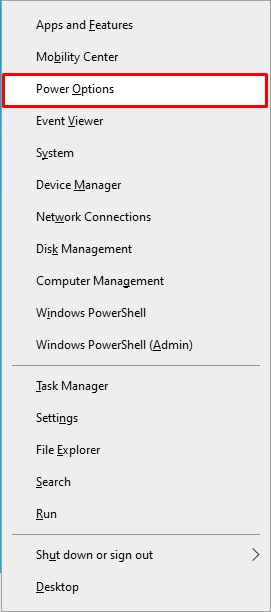
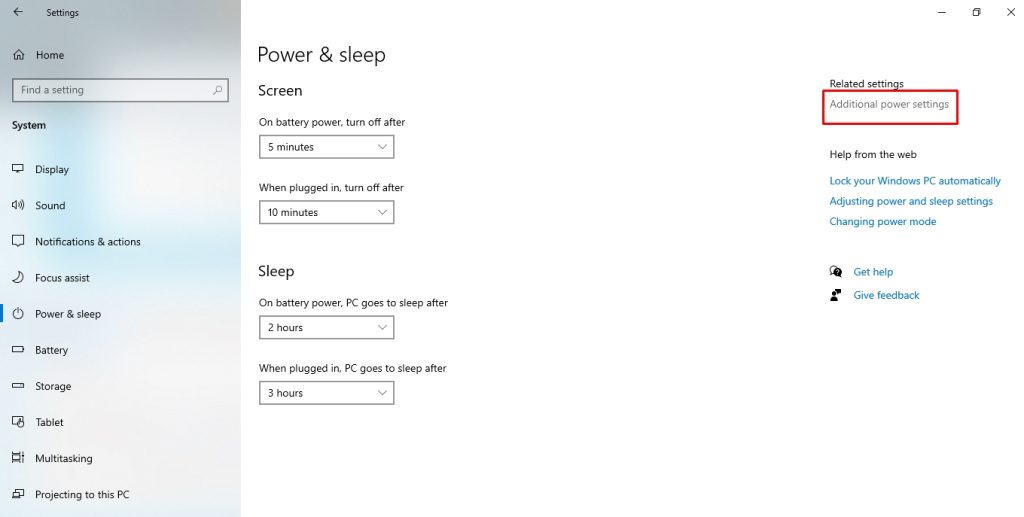
- Press Windows + X on your keyboard to open Power Options.
- Now, click Additional Power Settings under the Power & Sleep menu.
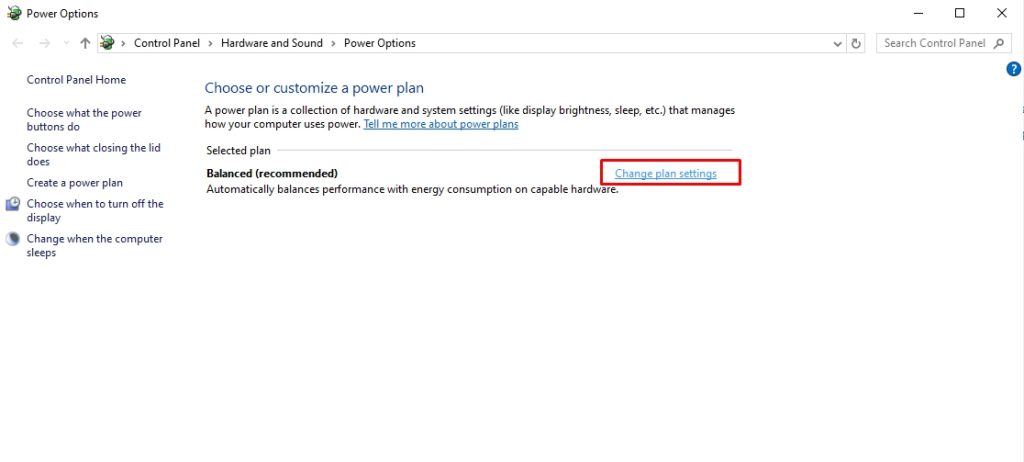
- Select Change Plan Settings from the Power Options window.
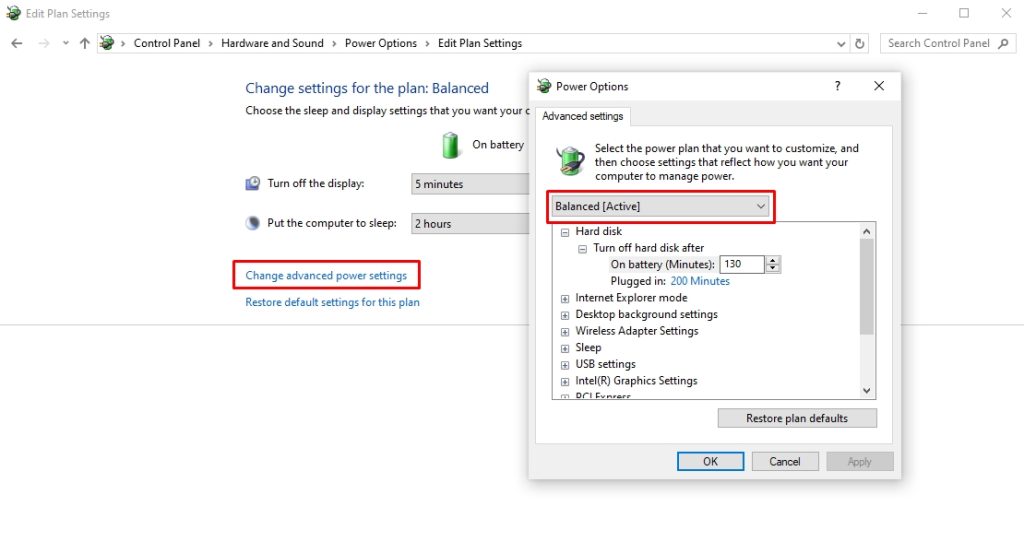
- Choose Change Advanced Power Settings, and switch from Balanced to High Performance. Click OK to confirm.
Method 9: Disable Antivirus Software Temporarily
Do you have antivirus or anti-malware programs downloaded to your PC? These programs create temporary files during security scans and updates. Accumulated over time, this can significantly increase disk space usage. Windows Defender can add to this issue by increasing network usage and I/O.
You can temporarily disable your PC's antivirus to see if it is causing the 100 percent disk usage on Windows 10. Once you do so, see if the performance and storage improve.
Method 10: Run Disk Defragmentation
Defragmentation is an excellent way to keep your disk data organized, making it easy to access and retrieve files. If the system has not undergone defragmentation, and your device data is scattered throughout, it will take the system longer to read and access parts of it. Hence, it may consume more disk resources.
Windows usually handles the defragmentation process automatically once a week. However, you can also do this manually if it is disrupted even once. This method only applies to HDDs (hard disk drives) and not SSDs (solid-state drives).
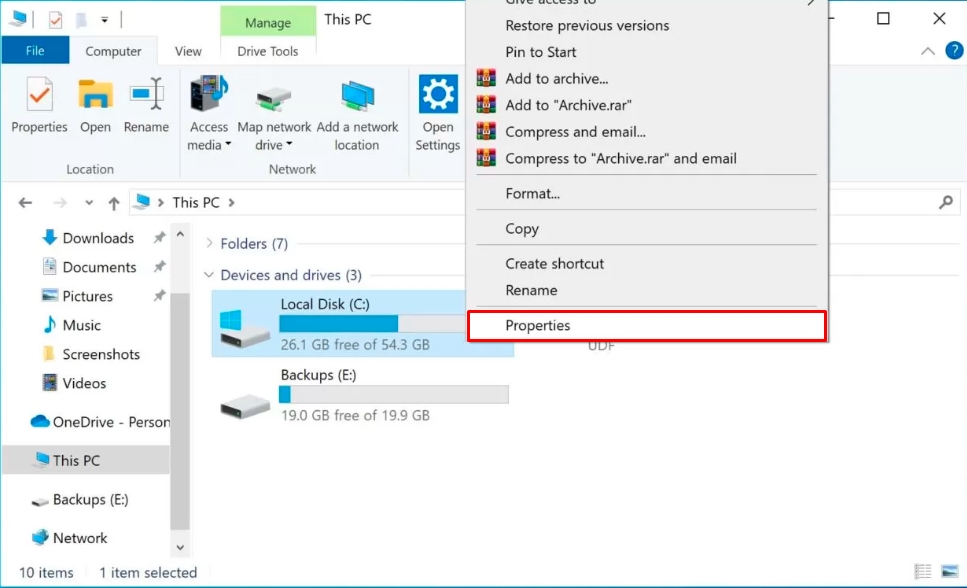
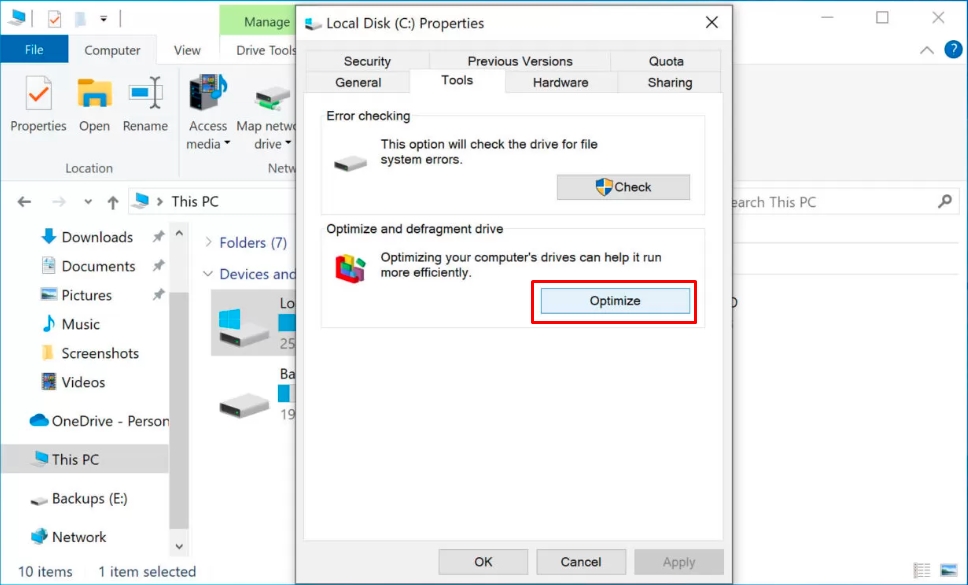
- Open the File Explorer, right-click your local disk, and click Properties.
- Visit the Tools tab and choose Optimize > Optimize to complete the process, and you are done.
Method 11: Perform a Disk Check
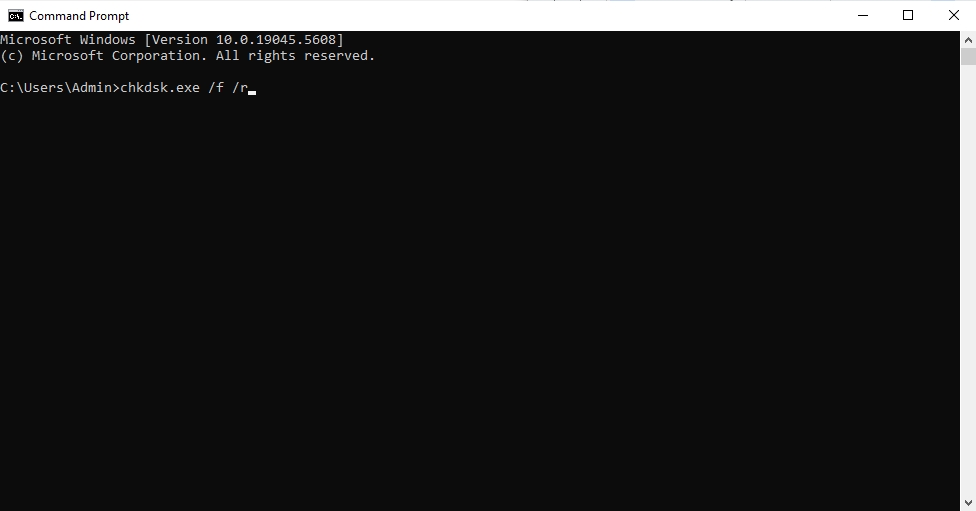
Still no progress? Running a disk check, also known as CHKDSK, might help. It systematically identifies disk logical and physical issues, which may have contributed to the disk 100 usage, and repairs them accordingly. Here’s how you can perform a disk check.
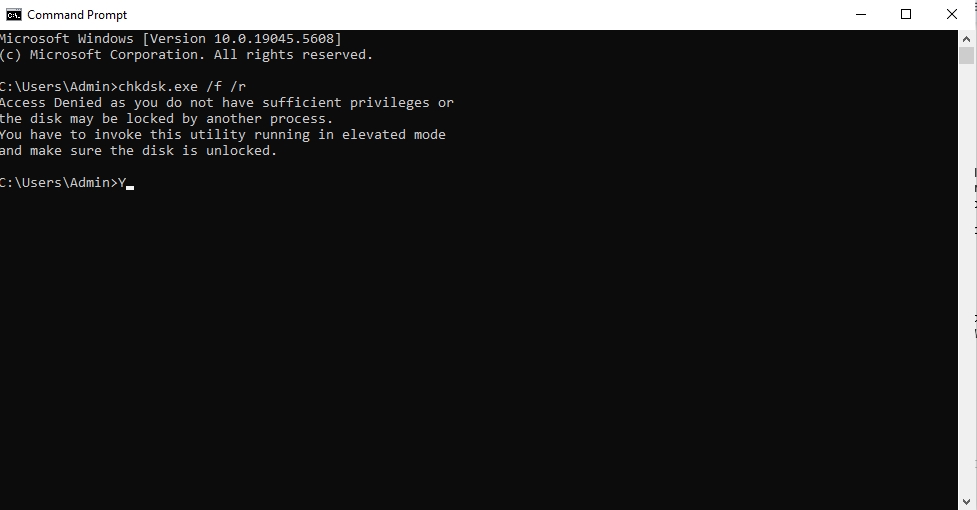
- Open the Command Prompt from the Start menu. Once opened, type chkdsk.exe /f /r and press Enter.
- Now, type Y to confirm the disk check.
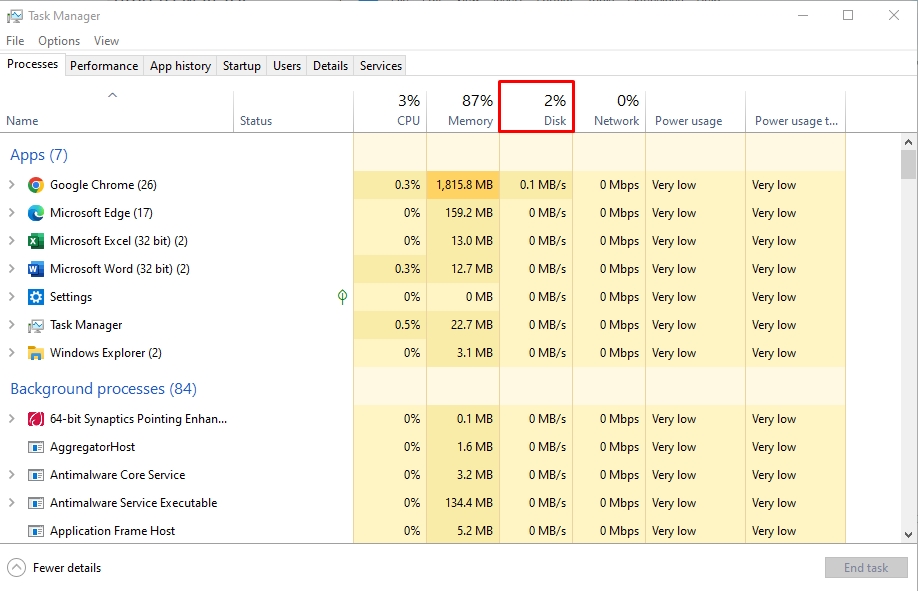
- Restart the computer and make sure all apps are closed. Once the disk check is complete, open the Task Manager to see your disk usage.
Disk Usage Best Practices
The 100 percent disk usage can slow down your computer and even shut it down abruptly. Here are some best practices you must follow to avoid this issue.
- Never Stop Disk Fragmentation: Fragmentation is crucial for maintaining your system’s speed. If you are working while a fragmentation process is running, Windows will pause it. Hence, it is better to allocate some free time for this process.
- Don’t Disable Windows Update: It is a misconception that disabling Windows updates can improve disk speed. However, this is not true. Updates are crucial for fixing security issues and bugs.
- Delete Unused Programs: Deleting unused apps can free up space. However, using Windows’ built-in uninstallation process does not completely remove the program’s associated residues, traces, and background processes. Credible third-party solutions like Master Uninstaller might help delete all the app’s associated components in a single click.
- Regularly Delete Temporarily Files: Regularly check your PC for cache, temporary files, background processes, and startup apps. It can help you free up space and avoid overloading the drive.
- Upgrade Hardware If Required: If you are still using an outdated HDD drive, consider switching to an SSD. An SSD is more efficient than traditional alternatives and has a low risk of 100% disk usage.
FAQs
Final Thoughts
Disk 100 usage in Windows 10 can significantly have a negative impact on your system’s speed and performance. Hence, it is crucial to avoid it from the start. Following some best practices like deleting temporary files regularly, uninstalling unused apps, and clearing out system registries might help.
However, it can get hectic to do everything again and again. But no worries! Master Uninstaller can help. Simply locate some infrequently used programs on your computer and delete them using this uninstaller. It will then remove their residues, background processes, and system traces for you.

-

Simple and Practical: Easily uninstall unwanted software.
-
Thorough Cleanup: Completely remove residual files.
-
Blacklist Protection: Identify and block malware and adware.